Thursday, September 29, 2011

Baby Bubbles

This spring I picked up a charm pack of Wee Wonderland and 1 yard of a coordinating Moda cross weave with no real plans or recipient in mind. Then one evening when I was low on inspiration and needed a fun, simple project to work on, I pulled these fabrics out.
I started by sewing the charms into pairs and then squared the prints up by adding cross weave to either side. This layout really seems to appeal to me, it's a similar process that I used to create the Big Blocks quilt last year. I think I like to try to create a floating effect with the prints in this layout.
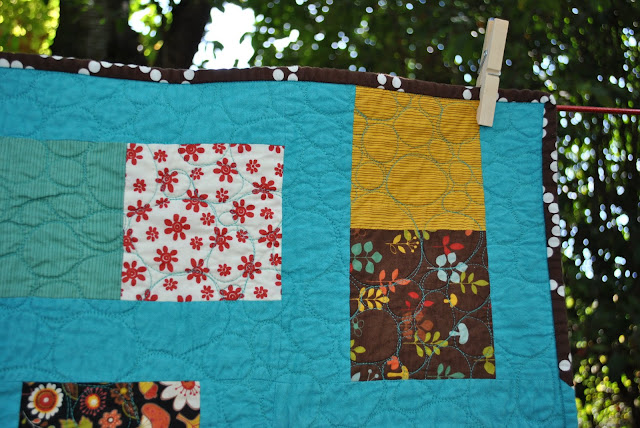
Here's my Wee Wonderlands quilt:
 Binding is Pearl Bracelet in brown by Lizzy House.
 I practiced bubble quilting a bit:
 For the back, I used a print from the Wee Wonderlands line and more of the Pearl Bracelet.
Details:
Prints are Wee Wonderlands by Keiki for Moda.
Solid is a Moda cross weave.
Binding (and backing) is Pearl Bracelet in brown by Lizzy House for Westminster.
Machine pieced and quilted with an all over bubble pattern.
Size: 35" x 44"

To be honest, when I first finished this quilt I wasn't really happy with it. The top felt too plain and I wasn't confident in my bubble quilting. I also didn't have anyone in mind to give this quilt to, which often makes it hard for me to give everything I have on a project. But after a trip through the washer and drier, the personality of this quilt really started to shine! The dense bubble quilting gives the quilt a really great texture, and helps the top sparkle. I've added it to a stack of quilts that I'm planning to donate this fall where I'm sure it will find an owner to use it and love it.
If you haven't done so already, head over to Sew, Bike, Quilt and check out her 100 Quilts for Kids. I have a small stack of quilts ready to go, now I just need to find a local organization to give them to!

Monday, September 26, 2011

When voile and double gauze meet

I found some fun nani IRO at a lqs and splurged on 5/8 yard, hoping to make a skirt. I mistakenly thought that the fabric was 54" wide, when in fact it was 45". That changed my plans a bit, and sent me to another lqs in search of some voile. I loosely followed the Flirting the Issue skirt pattern (an Anna Maria Horner freebie!), and here's how it turned out:
At first I was unhappy with the way the skirt poofs a bit where the voile and double gauze meet. Then I decided to try wearing the skirt at my natural waist, and it seemed to work! I do wish I had the option of wearing the skirt lower for a more casual look, but a little bit of modern trend is just what my closet needed!

Thursday, September 22, 2011

1/4" Bias Binding Tutorial

On Monday I posted about my Sorbetto Top with bias binding to finish the neck and arm holes. When I sew clothes, I strive to make them look as professional as possible. Bias binding was always something that I struggled with, until now! So, let's get started.
Supplies:
garment to bind
1/4" double fold bias binding (If you are binding a straight edge, you can use straight-of-grain binding)
binding foot (the foot for my Janome was $11, and well worth it!)
 The binding foot:
 Cut a piece of binding a few inches longer than needed:
 Open the first fold of the binding as shown:
 Slide the binding into the cone on the binding foot. (Do not unfold the binding completely, just open it up as shown above.):
 If you have trouble sliding the binding down in the cone, try trimming the binding end at an angle and using a straight pin to push the binding through:
 Using the pin:
 Pull the binding through the cone and down to the foot:
 Now pull the binding under and past the foot by a few inches:
 Before you begin sewing, you may want to change your needle position slightly. I like to move my needle a bit to the left, but don't move the needle over too far or you'll risk sewing off the binding.
You want to begin sewing a few inches down from the beginning of the binding strip (see the binding tail under the presser foot in the above photo). Chose a spot on your garment to begin applying the binding and insert the garment fabric between the folds of the binding, under the presser foot. I like to sew with the right side of the garment up:
 To keep the garment fabric tucked nicely in the binding while I stitch, I like to nudge the fabric into the fold as shown below. I sew slowly and continue to feed the fabric while at the same time gently nudging the fabric to the right, into the fold of the binding:
If you're stitching a neckline or armscye, stop with about 4" left to sew. Pull the garment out of the machine, and switch to a regular presser foot. Measure, trim, and join the ends of the bias binding (just like you would for quilt binding). Then carefully stitch the binding down along the remainder of the neckline or armscye.
Your bias trim should be neatly and evenly sewn down on the top and bottom, like so:
Front!
 Back!
Now that I know how to use my binding foot and create such perfect binding, I think I will enjoy garment sewing a bit more!

Monday, September 19, 2011

My Sorbetto

A few weeks ago we had a friend from Matt's work over for dinner. After dinner, they started on a work project and I decided to start a small sewing project. The Sorbetto Top, a free pattern from Colette Patterns, was the perfect choice!
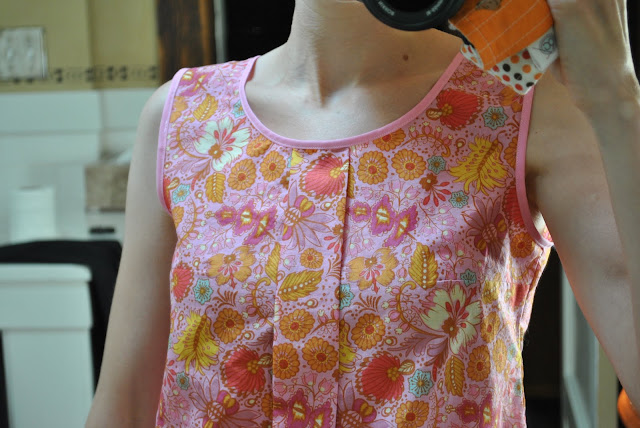
This top has only 2 pattern pieces, a pleat down the front, simple bust darts, and bias binding around the neck and arm holes.
I used a voile from Anna Maria Horner's Little Folks, which is very lightweight. The simple seams and lightweight fabric were the perfect combination for french seams.
I used premade 1/4" bias binding for the neck and arm holes. I also learned a few great tips for sewing binding on, I'll share those in a tutorial on Thursday.
First, let's see my Sorbetto!
The front (excuse the dirty mirror!)
 Front details
 The back
For the most part, I like the fit of this top. I did take out the shoulder seam by about 3/8" because the bust dart was way too high and the arm holes were too tight. I'm still not thrilled with the placement of the bust dart, but I don't think it's too noticeable.
Even with the shoulder seam adjustment, I took about 3/4" off the bottom of the armscye. I'm really sensitive to how my tops fit under my arms, so I knew that  if the armscye was too tight, I wouldn't wear the top.
I wore my top out to dinner with a yellow cardigan, and I think it looked pretty cute! Next time I will alter the pattern to fit the bust darts properly and enlarge the armscye, but all in all this first version is very wearable.
Now for a sneak peek of my bias binding!
The front
 The back
Check back on Thursday for a tutorial on applying bias binding!

Thursday, September 15, 2011

The Seattle Dining Room

For some reason I thought I had blogged about this weeks ago. But apparently not!
I wanted to share a few photos of our dining room in Seattle. We started off by painting the walls a bright yellow. It's perhaps a bit too bright, but I've gotten used to it.
Next I recovered an upholstered chest with some Denyse Schmidt from JoAnn's. (The chest is full of clean linens-these are the things you do when you live in a small house!)
Next I made lots of cloth napkins:
And then I created a new table cloth to match!
 It's reversible!
All fabric is from the Denyse Schmidt line at JoAnn's. The white is kona pfd (prepared for dyeing-that's what my JoAnn's had at the time). I sewed the table cloth with a reversible log cabin, quilt as you go technique (there's no batting involved). I especially love that technique for table clothes because they get washed a lot, and the quilt as you go method keeps the layers from shifting around!

Monday, September 12, 2011

What happened to Friday? *Giveaway Winner!*

Wow, I totally flaked out on the giveaway last week! I had a bit of a hectic weekend, plus Matt is literally on the other side of the world for work. Thankfully we have awesome friends who are always willing to help out when we need it! If only one of them could keep track of my blog for me... ;)

Anyway, on to the winner!


Congrats, Deanna! I will send you an email shortly! Thanks to everyone who is playing along. It's fun to hear from commenters through the giveaways who are typically a bit more quiet around here. I feel like I'm getting to know all of you a bit better!

New hobby high

There's nothing like an endorphin rush from a new hobby, am I right? Judging by the amount of "stuff" that I purged before we moved across the country, I'd say that I'm pretty much addicted to the rush. In fact, Matt may have told me a time or two that a drug habit would be cheaper than my crafting habits... ;)
And that's why I couldn't stay away from the metal frame pouch craze for long! I showed two of these recently in my Pretty {Little} Pouch swap post and my Make Mine Modern swap post. The third pouch was one of my practice pouches, which I gave to my running partner. (It's ok, she's sciency too, so she can appreciate the need for experimentation.)
 The linings (sorry about the blurry picture!):
There was a fourth pouch. Well, actually it was the first pouch that I made. But Addy laid claim to it, so it's no doubt buried in one of her 500 purses at this point!
These were really fun to make, and I still have a few more frames left. Not only did I buy these 3" round frames, but I also got a few rectangular frames to play with. I think these will make great Christmas gifts!
I bought my frames from this etsy shop.
And I highly recommend this glue (and that etsy shop. I bought from them-free shipping and I had the glue in less than a week! From the UK!).
In case I haven't succeeded in pushing the metal frame pouch drug trend on you, check out these. And this. And this.
Go ahead, you know you want to.

Wednesday, September 7, 2011

Featured on QuiltStory!

Today QuiltStory is featuring my "What Lies Ahead" quilt. Go check it out!

While you're over there, spend some time reading the other quilt stories, visit their Etsy shop, and join the Fabric Tuesday fun!

And if you haven't already, hop over to my Monday post for the giveaway!

Monday, September 5, 2011

Pin Catcher Tutorial and Giveaway!

I missed the August Pay It Forward giveaway, but I've got something cool for September! I can't remember where I saw the idea for a magnetic pin bowl, but it's been in the back of my mind for awhile now. Every time I stroll through a second hand shop, I'm on the look out for a specific style of bowl. Finally a few weeks ago I ran across some!
(Edit: a reader kindly pointed me to this post by Diary of a Quilter. I believe that is where I first read about this idea!)

Supplies:
Bowl with recessed bottom
Strong magnet (I found mine in a 3-pack at JoAnn Fabrics)
E6000 or other very strong glue
 A close up of the bowl bottom:
First up, squeeze a nice size puddle of glue onto the bottom of the bowl: 
 Now smoosh the magnet into the glue:
 Let the glue dry, turn the bowl over, and ta-da!
I found that this even works for plastic bowls! This one is for Addy: 
 The bottom of the plastic bowl:
I got a bit carried away with these, I was just so excited to find the right type of bowls at a local store. I'm going to give away 2 of these bowls to one of you! 
Just leave me a comment below, and I will announce the winner on Friday, Sept. 9th.

Pretty {Little} Pouch Swap-Sent!

I had a lot of fun in this swap! I decided not to share a full pic of my partner's pouch until after it was received. So here it is, with a few little extras tossed in!
First, the pouch front:
 Want to get a closer peek?
Fabric is Innocent Crush, by the amazing Anna Maria Horner!
I started with a center hexagon and built out in a log cabin style. Every other row of logs is actually a folded log. It's a bit hard to explain, but it gives the pouch some fun dimension! The rows that aren't folded are the ones with hand quilting in them. Finished size is about 7"x9".
And for the back:
 My partner's name was Michelle, so I thought I'd personalize her pouch a little bit! (Fabric is quilter's linen in straw.)
 And of course the inside, lined with some Good Folks.
I also made a metal frame coin purse:
Here's the whole lot, including a small pin cushion that I made from some munki-munki, a little stash of Heather Ross goodness, and a local greeting card and post card:
 What, you want a better picture of the Heather Ross goodies? Ok...
I had a lot of fun with this swap, and Michelle was really happy with her pouch. I'm so glad that she likes it so much!

Thursday, September 1, 2011

Make Mine Modern Swap-Sent!

You had to know this post was coming, right? :)

I took some risks with this swap. My partner described her decorating style as country, but her inspiration mosaic was very modern. She also listed her favorite color as blue, but in her mosaic she mentioned her current love of bright greens and yellows, and contrast.

I decided that playing it safe isn't nearly as fun as standing under fluorescent lighting while Michael Kors, Heidi Klum, and Nina Garcia pick apart every little part of your design. And so I took a risk.

Here is the sewing machine cover that I came up with (and yes, my partner did ask for a sewing machine cover. See, I do listen, sometimes!):
 I made the machine cover as 1 long piece, and added velcro tabs on the sides to hold the front and back together:
 Here's a better picture of the machine cover laid out like a table runner. I am totally in love with the piecing on this! If it fit my machine, I might have been tempted to keep it!
 The back side:
Because I was nervous about the style and colors of the sewing machine cover, I decided to make a pin cushion and thread catcher to match. At least that way they match each other, right? :)
Pattern is a freebie from Oh Fransson!
A closer peek at the super fun button that the thread catcher hangs from:
I also made a metal frame coin purse from some Lantern Bloom (oh, yeah, my partner likes earth tones. This fits, right?):
Lastly, here's the fabric that I sent along. Three half-yard cuts of The Ghastlies, and a charm pack of Botany just because!
 Here's the whole lot of it before I packed it up (including a postcard of a gnome in Seattle!):
I had a great time with this swap. I stretched myself by doing some improv piecing, and I took some risks with my choices. Now the question is, do I have immunity for the next challenge? ;)
I'm happy to report that my ideas were very well received! My partner loves her gifts, which makes me *so* happy!