My gathered bag was on the Noodleheads blog today!
Check it out!

Monday, July 26, 2010
Saturday, July 17, 2010
Some Good Folks love
Remember this tie? I had a really hard time cutting into the fabric, but in the end I was glad that I did. I couldn't have picked a better print for that project!
Because neckties are cut on the bias, I ended up with some odd scraps. I didn't want to cut into them for the scrap bins, so I folded them back up and stuck them with the rest of my stash.
So when I was searching for the right print to make into an ipad cover, I knew that my Good Folks would be just right! It's one of those fabrics that I can look at over and over again without getting tired of it.
I used the dimensions that Quilt Dad specified in his Moda Bake Shop tutorial and added a velcro closure with a raw edge flower. I also pulled out my bias binder to attach the binding at the top of the sleeve-once you get over the learning curve, it's a great tool!

I'm waiting on fabric to make Mat a similar sleeve, and I think I will cut down the dimensions next time. There is a lot of wiggle room in mine, and I personally prefer a snugger fit. Overall I love how it turned out, and with the velcro closure I think the fit will be just fine!
Friday, July 16, 2010
The Far, Far Away dress
Now that the Far, Far Away II fabric has hit the stores, I'm finally getting around to using and blogging about my Far, Far Away I!


This dress started off as a shirred sundress. I wanted to make something for myself, and I read some really great reviews for these simple dresses. Not wanting to mess up, I thought it would be wise to use a pattern for what was supposed to be a super easy dress. Lucky me, I found the Mendocino Sundress pattern!
I printed the pattern, stared at it for awhile, and held my breathe as I cut into the fabric. After I had the pieces assembled and all of my edges serged, I started sewing with the elastic thread. 16 rows of stitching later, I held the dress up. Wow, it looked tiny. But it's supposed to be tight, right? Well, kind of. I could get the dress on, but it certainly didn't look cute. I searched all over the internet for tips, when I stumbled on some comments about printer settings. Oops. My pattern pieces were probably half of the size they should have been!
There wasn't any chance that my purple double gauze would even be transformed into a shirred dress, so I compromised. I added some 1" elastic at the top, thin little halter straps, a gathered piece under the bust, and a tie. The gathered piece is only sewn down to the dress at the top and bottom, so they form a nice channel for the tie.


It's soft and comfy, plus it has fun pockets. Overall I think it's the best fabric save I could manage with the pieces that I already had cut. :)

Thursday, July 15, 2010
The Anna Tunic
I love this dress! I'm really glad I took a chance with this floral print, because I think it makes the entire dress.
Pattern: Amy Butler's Anna Tunic
Fabric: Amy Butler, Love line
Alterations: After reading reviews, I took 1" off the bottom of the armscye to enlarge the opening. I think I need to take another 1/2" off for comfort. I omitted the lining, and I added 2" to the hem line by adding 1" to the pattern and sewing a 1" hem rather than a 2" hem. Because I didn't line the dress, I had to finish the bottom edge of the armscye-I used bias binding.


Details:


And with a wider belt:

I don't love the belt from the pattern. I actually like the shift style with no belt, or the wide white belt.
The pattern was easy to follow and had great instructions. I might change the construction a bit next time. And I think the neckline could use some alterations so that it isn't quite as high in the front.
I really like the flower detail, and the construction was very forgiving. I wasn't going to include the flower, but it really adds to the dress!
Wednesday, July 14, 2010
Simplicity 2587
This was a project from last spring, but I think it's still worth a blog post. :)
Pattern: Simplicity 2587, view B
Fabric: Amy Butler, Midwest Modern 2 line
Alterations that I made: I sized down a LOT. I think I went down 3 or 4 sizes, based on the pattern reviews. I also did a rolled hem, which added about an inch of length to my dress.
Finally, I shortened the bias straps and tacked the bust line closed a bit so that it fits more comfortably.
If I were to sew this pattern again, I would omit all of the interfacing. It made the fabric harder to work with, and the waist was a bit stiff until it was washed a few times. I might also line the top-without lining a bra is an absolute must.


The pattern was very easy to follow, and the instructions provided plenty of detail.
I've considered taking up the hem. I usually don't like a short hem on a dress that has a gathered waist, but the gathering on this dress isn't heavy enough to cause the poof that I want to avoid.
Tuesday, July 13, 2010
Simplicity 2584
I finished this dress back in February, but it took me awhile to figure out how I wanted to wear it. I like it belted, but that shortens the dress by quite a bit. It also looks really cute with skinny jeans and ballet flats.
Patern: Simplicity 2584, view B
Fabric: Amy Butler, Daisy Chain line
Alterations: I sized down based on finished garment measurements, left the fold detail off of the bottom of the dress, and added a hook and eye about 1" above the bottom of the front slit.
I also added a bit of length to the dress. The trendier patterns seem to be running on the short size, in my 5'4" opinion.
If I sew this pattern again, I will omit all of the interfacing. Quilting cotton has enough body already-and when a facing is included I find that adding interfacing just makes the garment too stiff. In fact, I might even leave off the yolk facing, too.
I will also bring the slit in the yolk up by several inches.
This pattern was really easy to sew up, and the instructions were very detailed. I would recommend it-but be sure to check the finished garment measurements before cutting!


There aren't any detail pictures of the facing, but that's because I spilled ice cream on it. :P I wasn't sure if I wanted the yolk to be as pronounced as it is on the pattern envelope, so I was pleasantly surprised when the busy print camouflaged the yolk a bit!
It's too warm for the 3/4 length sleeves right now, but this will make a great fall dress/tunic.
Monday, July 12, 2010
First Bloom
This quilt reminds me of the beginning of spring...the first burst of warm weather that brings just a few patches of blooming flowers, when the landscaping is fresh.


I had a few design ideas incorporating a splash of beautiful prints along with coordinating solids, and this is where I landed! I'm really happy with the finished quilt, and I can't wait to work on a few more ideas.
For this quilt, I featured Sandi Henderson's Meadowsweet along with Kona cotton in bone and coffee. The pieced block in the upper left corner includes a fun ruffle that adds a unexpected softness to the design.

I just love square in a square blocks. They are simple yet striking, and just changing the size, pattern or shade of a fabric creates a whole new look!

I stippled this quilt to help bring out the soft crinkled look. After washing, it measures 45" x 54".
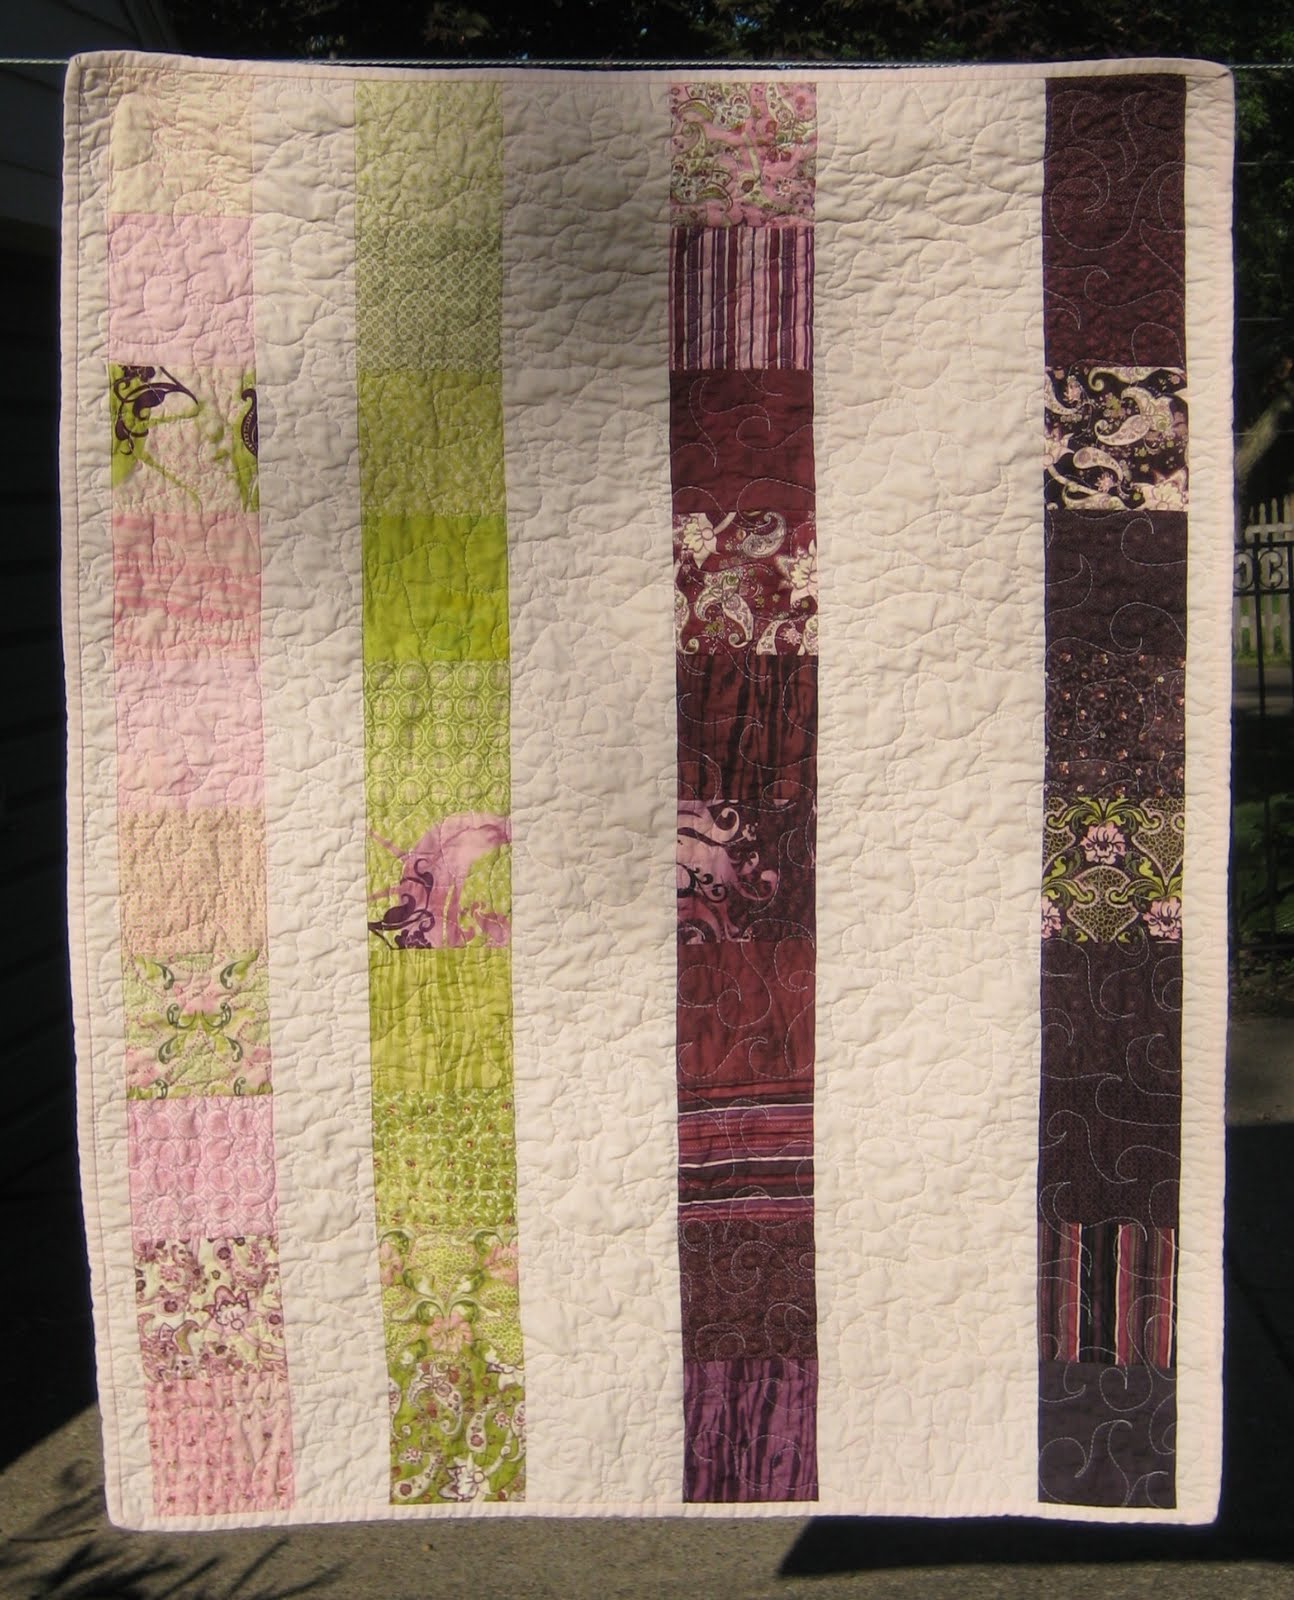
The backing is a large scale yellow floral print with a border of Kona in bone.


I just love square in a square blocks. They are simple yet striking, and just changing the size, pattern or shade of a fabric creates a whole new look!

I stippled this quilt to help bring out the soft crinkled look. After washing, it measures 45" x 54".
The backing is a large scale yellow floral print with a border of Kona in bone.

This quilt is now in the shop!


Sunday, July 11, 2010
The Simple Life
I just love the Make Life... fabric line by Sweetwater. It is bright, fresh, modern, and so much fun to work with!
I pieced this quilt from:
1 charm pack
1/2 yard of 1 accent fabric for border
1 1/2 yards for binding and backing

After using a simple piecing design, I wanted to try some fun quilting. I played around with some straight line quilting on this piece, and I really like the secondary design that the quilting creates. I started with some grid quilting 1/4" away from the pieced edges and added diagonal lines also set 1/4" from the pieced intersections. The combination of grid quilting and some diagonal quilting created a simple, modern design that complements the fabric line really well!
I love this line so much that I may have to buy another charm pack to make a table runner for myself!
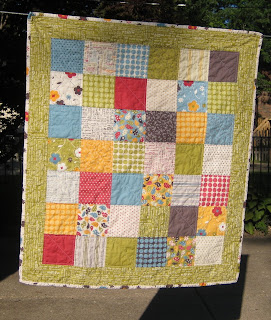

Measuring 32" x 36", this quilt would be great as a table topper or a stroller quilt. Add a splash of color to your kitchen or nursery with this fun modern quilt, now for sale in the shop!

Tuesday, July 6, 2010
Romantic Baby
I wanted to play around with some simple piecing with charm squares.
For this quilt, I used 1 Eva charm pack by Moda and lots of Kona in pale flesh. To play up the soft colors and prints, I quilted this piece in an all over swirl pattern.


For this quilt, I used 1 Eva charm pack by Moda and lots of Kona in pale flesh. To play up the soft colors and prints, I quilted this piece in an all over swirl pattern.

I really love how it turned out, and it's now listed in the shop!

Monday, July 5, 2010
Wonky log cabin - selvedge style!
It took me awhile to get into the selvedge sewing trend. I love to see the projects that people come up with, but simple selvedge piecing just didn't appeal to me...until I realized that I could incorporate selvedges into a bigger pieced design!
Now that I've started working with selvedges, I'm finding it really hard to throw away even the tiniest pieces of fabric. Which is why I've made a FOURTH Hope Valley pillow! It's not my favorite, but I think that it's a nice combination of scrap, improv piecing and the more structured quilting that is my comfort zone. I really did use up just about every scrap of Hope Valley that I had, which is a good feeling.


Now that I've started working with selvedges, I'm finding it really hard to throw away even the tiniest pieces of fabric. Which is why I've made a FOURTH Hope Valley pillow! It's not my favorite, but I think that it's a nice combination of scrap, improv piecing and the more structured quilting that is my comfort zone. I really did use up just about every scrap of Hope Valley that I had, which is a good feeling.

I think that I like the back of this pillow even more than the front. What a nice option to have when I'm making my bed in the morning!

Saturday, July 3, 2010
Stash Busting!
Moving into a much smaller design space has forced me to take a good look at my stash. In the past, I shopped mostly sale fabric. Working at a quilt shop made that pretty easy, because I often saw the mark downs before customers. But it still meant that there was less to choose from-and it was easy to come home with 5 yards "because it was on sale".
I've been offering fabric and patterns to all of my sewing friends and I'm also being more diligent about my fabric purchases. It's so much easier to buy at full price when I have a project in mind already! And to offset my new purchases, I have been sewing from my stash as much as possible. So when I inherited Matt's old mac, I knew that a charm pack would make the perfect laptop sleeve.
Fabric: Blush from Moda by Basic Grey
Lining: a soft pink pintuck fabric - Moda?
I included a cotton batting, machine quilting in a random curved line pattern, and a velcro closure.


I didn't need the entire charm pack for this project, so I was able to choose my favorites. The other squares went into my stash!
The most difficult part of this project was the fit. I wanted a snug fit, but my first attempt was too small. This sleeve is a good size for slipping the laptop in and out, and there's enough room for the charger if I want to squeeze it in there.
Friday, July 2, 2010
Not-a-Frock by Friday
I just can't stay away from the Frock by Friday events over at Grosgrain!
They have been a lot of fun, and a great way to sew from my stash. I seem to be sewing more dresses than I can wear, though! The June FbF was to lengthen a summery shirt, so I took the opportunity to create the shirt version instead.
Fabric: Anna Maria Horner's Little Folks voile
Pattern: Tara from BurdaStyle
My alterations:
I stitched the elastic casing directly to the shirt instead of just enclosing the elastic in the seam allowance. This forms a neater look.
I used bias binding to finish the to edges of the front and back.
I eliminated the sleeves and used bias binding for straps.


Overall, I like this top. The fabric is really soft and it fits well. The pattern was really easy to use, and I may use it again to sew up a few camis to sleep in. This top may even end up in the pj drawer - look how well it matches my cutie "lingerie" pj pants!

Thursday, July 1, 2010
Beat the heat without sweating it!
I'm really picky about my water bottles. I prefer plastic, spill resistant, with a straw. Until Camelbak came out with their Better Bottle, I thought I'd never find a bottle to fit my needs. But once I tried it, I was hooked! I could fill the bottle with ice water and toss it onto the passenger seat of my car without worrying about any spills. I can also take a drink while I'm driving without the distraction of trying to keep my water from ending up in my lap. And it's dishwasher safe! Finally, the nearly perfect water bottle.
Yes, it's nearly perfect. What could I possibly dislike about it now? Bottle sweat. Yep, I'm seriously that picky.
Rather than search for an insulated bottle that fits all of my other needs, I created a water bottle cozie! Not only does it keep my bottle from sweating all over, but it helps to keep my drink cool for longer. Plus it just looks cute. ;)

I took my bottle cozie for a test run before making a smaller version for the kid-size bottles. Once I knew that I liked my design, I created one for Addy's bottle, too.
The large cozie fits the 750ml Camelbak Better Bottle perfectly. My husband uses the 1L Better Bottle, and the cozie is a tad bit too small for his bottle.
The small cozie fits both the Camelbak Kids Bottles and the Nalgene Kids Grip-n-Gulp.
The small and large cozies are now listed in the shop. If you have a custom request, please contact me! I can create a cozie in nearly any size, color or pattern to fit your needs.
Subscribe to:
Posts (Atom)