Saturday, October 2, 2010

Halloween treat bags with Sweetwater Label Crew labels!

I signed up for the Sweetwater label crew when they first made the announcement.  I thought they would be nice little projects to work on when I wanted some instant gratification.  I just didn't realize how cute they would be!  I had these little treat bags complete the night that my labels arrived!

The label kit came with 4 graphic labels, a personalized label with my name on it, and the pattern to make these little guys.


Three of the bags became treat bags for my mom and two close friends.  The fourth little bag is all mine!  On my bag, I used a graphic label for the front and my personalized label for the back.


I added some candy and a pair of Halloween socks to each bag.  Then I wrapped them up and added a handmade card.  It seems like there has been a burst of cuteness in Halloween fabrics and paper crafts.  I don't remember being so swept up in the holiday before, but this year I have more fabric, paper, stamps, and ideas than time to create!

Friday, October 1, 2010

Sleeve Vent / Shirt Placket Tutorial

Wow, this has been on my to do list since June! Back in May, Grosgrain hosted a Frock By Friday featuring a cute shirtdress pattern (pattern and instructions here). The pattern came from the Bernina website - in German! After translation, the instructions were very basic.  The placket instructions were especially lacking, and referred to a sleeve vent technique.  I wasn't happy with how my placket was turning out, so I did some internet searching.  I found another Bernina pattern involving a sleeve vent, which had better instruction.  Those are the instructions that I followed, and I thought I'd make up a tutorial following these steps!

Something that helped me when I was muddling through this process was to see a completed placket.  I went up into my closet and pulled out one of my husband's polo shirts.  Any time the instructions were unclear, I would refer to his shirt!

To start with, you will need a strip of fabric for the placket and the shirt front or sleeve.
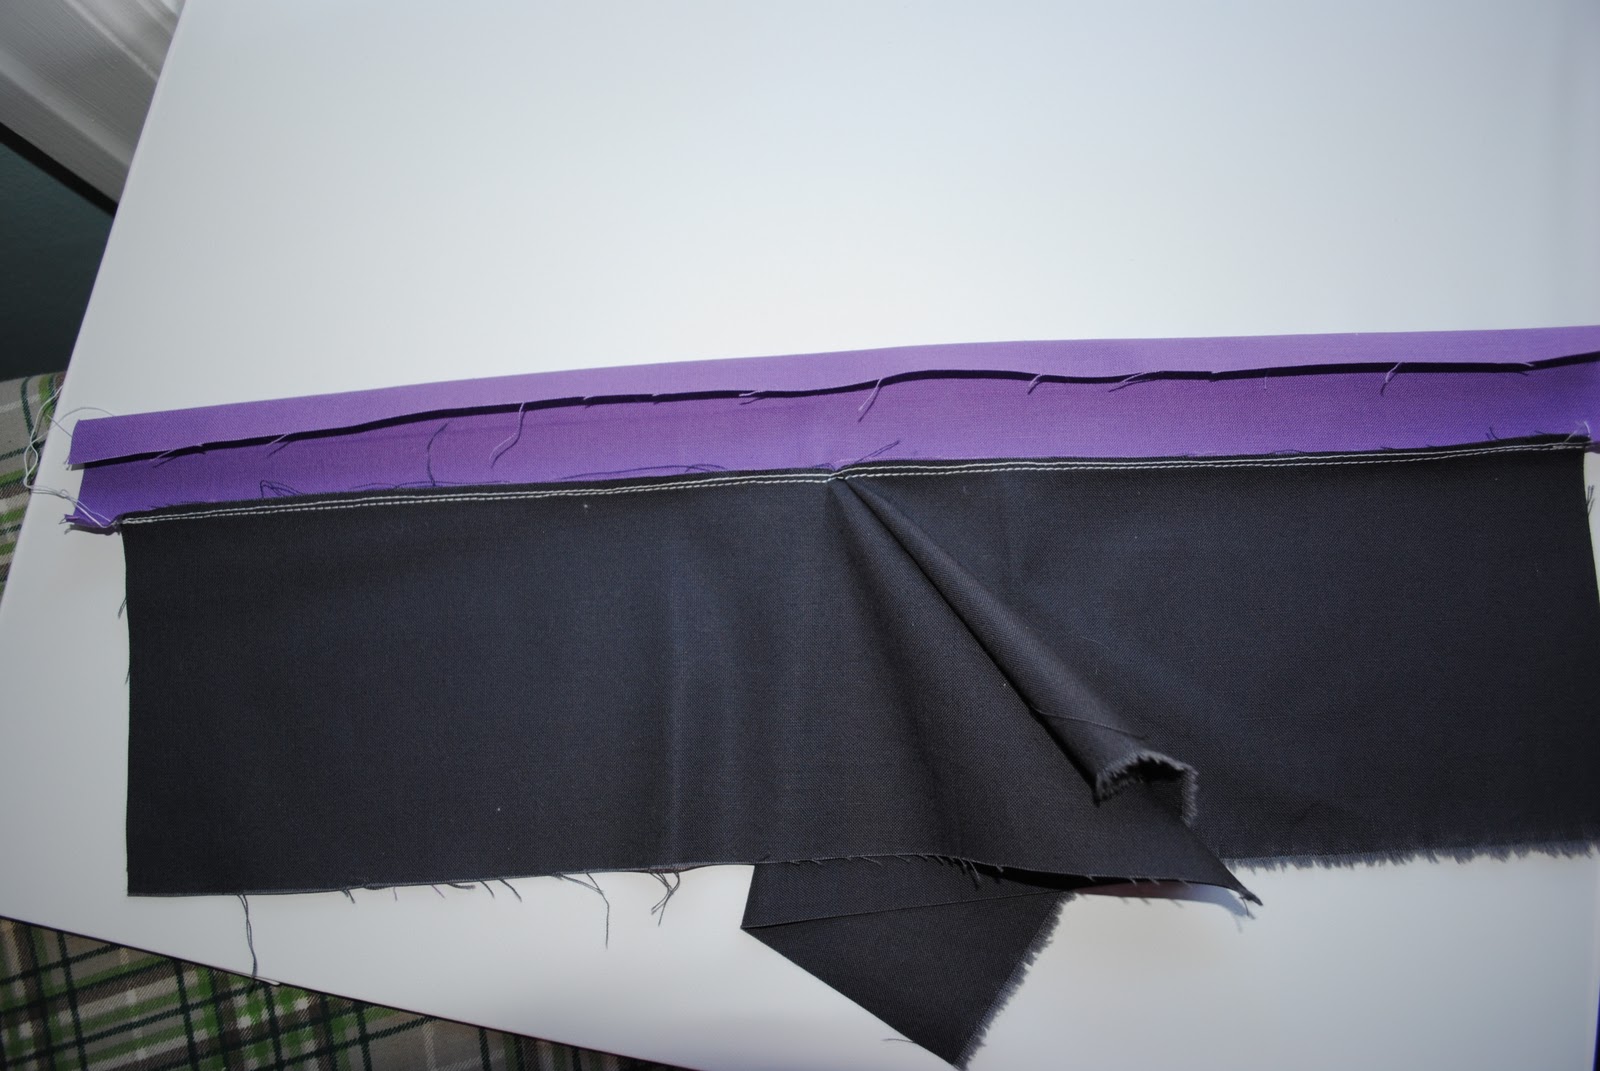
I cut my placket piece at 2.25" wide and longer than 2x the length of the finished placket (in the photo below, my purple placket strip is folded in half).  If you want a 10" long finished placket, start with a strip that is 2.25" x 25".  The excess can be trimmed off later.  I like to press a light crease down the center of my strip, we will use that as a guide later.

Draw the center line for the placket on your shirt front or sleeve:
Next, sew down one side of the drawn line, sew 3 small stitches across the bottom of the placket line, and back up the other side.  This is stay stitching.  When sewing my stay stitching, I bumped my needle over 2 positions from center and aligned my drawn line with the center line on my presser foot.  I also shortened the stitch length from 2.5 to 1.25 for the small stitches at the base of the placket line.

Now cut down the drawn line, but do not cut through the 3 small stitches that you made across the base of the placket.
Let's apply the placket strip! With the main fabric on top, align the raw edge with the raw edge of the placket strip. Sew the two pieces together just outside of the stitching you've already made.
When you reach the base of the placket, you will have to slightly stretch the main fabric.  I like the stretch the fabric slightly to first sew across the base of the placket:

After you've sewn across the base of the placket, pull the other side of the main fabric towards you and align the raw edge with the placket strip.  Sew down the remaining portion of the placket strip.
When the placket strip is sewn down, iron the seam towards the placket.
If you didn't do so earlier, you'll need to iron a crease down the center of the placket strip now.
Then press the edge of the placket strip in to meet the center crease.
We are going to encase the raw edges now by folding the placket strip along the center crease.  You want to be sure that the folded edge of the placket is covering the stitching lines by about an 1/8 inch, or more.
I like to pin at this step.
Turn the piece over.  To stitch down the back of the placket, you'll want to stitch in the ditch on the front.
At the center, continue to stitch slowly in the ditch and gently pull the main fabric so that the placket is open.
When you finish stitching in the ditch, turn the piece over and check that you caught the folded edge of the placket in your stitching. If you missed any sections, pick out the stitches, repin the section and sew it down again.
Here is the seam that was stitched in the ditch:

If you're making a sleeve vent, you can follow the instructions in the pattern that I used above to sew the diagonal line on the vent and continue with your sleeve.
For a shirt placket, we have a little more work to do.
Press one side of the placket under the main fabric.  In the photo below, the right side shows the placket pressed under.
Now lay the piece down so that the main fabric is flat.  Press well.
Now we will stitch down the portion of the placket that was folded back. My placket is 3/4" wide, so I stitched down 5/8" from the folded edge.
When you reach the base of the placket, you'll have to pull the other side of the placket towards you to keep it out of the way.  Sew to the base and backstitch a bit.
I like to stitch across the base of the placket as well.  To do this, lay your main fabric out flat.  Press it if needed.

Now stitch across the base of the placket, making sure that you catch the placket fabric in this seam. It will be bulky, so just sew slowly.
And you're done!  Here are some pictures of the front and back.
 
You may notice some small puckers at the base of the placket.  To minimize these, you have to keep your stitching lines at close together as possible when sewing down the placket strip in the beginning.  That would involve sewing the stay stitching lines closer together and sewing as close to the stay stitching as possible when sewing down the placket strip.
A woven fabric will naturally show more puckering than a knit, because the knit will stretch. A lot of the smaller puckers won't be noticeable on a completed garment, though.

If you have any questions, leave me a comment or send me an email! I tried to include more photos than usual, because I tend to be a minimalist when it comes to tutorials.

Monday, September 27, 2010

Polka dots, stripes, and a cute dog print!

I cut into a little bit of my Heather Ross stash to make this camera bag.  I saved some of each print for the scrap quilt that I want to make, but all in all I think this was a great project for these prints.  It's something that we will use, and it adds a little bit of fun to an otherwise boring bag.

I followed the basic measurements and construction for the Capture the Moment camera bag from the Sew Liberated book.  I was going to draft the pattern from scratch, but I wasn't in the mood to troubleshoot.  So I headed over to JoAnn's with my coupon in hand, and I got the only copy that they had in stock.  Woo-hoo!!

This pattern was really well written, and it came together very easily.  I used canvas for the interior and exterior of the bag body, and a mix of canvas and my Heather Ross prints from the top flap.  The pattern calls for a wide wale corduroy, which I would have preferred if I hadn't already purchased the canvas.

Here are a few of my changes:

Bag strap.  The original pattern calls for D-rings and lobster clasps to attach the strap to the bag body.  I liked the idea of being able to remove the strap, but the D-rings weren't working out well.  They twisted around quite a bit, so I replaced the D-rings with rectangular rings and ditched the lobster clasps.  I also used my printed fabric to cover a length of 1.5" webbing for the strap.  I have mentioned this before, but this is my favorite method for creating a bag strap.  It ends up really sturdy and durable, plus you can cover the webbing with whatever coordinating print you'd like!  I used canvas for the Festival Bag strap, and even the added bulk was no problem.

Pockets!  I added a zipper pocket on the outside of the bag back and a small pocket on the inside of the bag.
 

Top flap.  I'm not sure if I like this change, to be honest.  I was worried that the top flap wouldn't cover the bag well enough, so I created a flap that would cover the top of the bag like a gift box top.  I didn't make the sides quite deep enough for my liking, so I am going to use the bag for a bit before I decide if I should change it.  I also used 2 layers of batting for the top, which isn't quite enough structure.  If I change the shape of the flap, I will probably insert a piece of 1" foam as well.  (And get a load of that piping!)

Bag binding.  This was a small change, but I love the effect that it had.  To finish off the top of the bag, the pattern directs you to make a length of binding and cover the top raw edge with it.  Because the canvas is bulky, I decided to add a small section of my polka dot print.  I applied the binding almost all of the way around the bag, with part of the beginning unstitched (in the same fashion as if you were to bind a quilt).  As I came around the bag, I stopped stitching the binding.  I measured the correct length, trimmed my binding, sewed the two ends together, and finished applying the binding to the bag top.  It worked out really well to reduce bulk, and I love the pop of white when I open the bag!

I had a lot of fun with this bag.  Initially I procrastinated quite a bit, but the construction when off without a hitch!  I owe my sister a camera bag, so you'll probably see another one of these around here some time.  As soon as she chooses her fabrics. :)


Thursday, September 23, 2010

Tree Skirt/Table Topper Tutorial

I fell in love with this Christmas fabric as soon as I saw it.  Riley Blake seems to be coming out with some really cute prints!  I'm a sucker for anything cutesy/whimsical, so these prints just had to come home with me.

I purchased mine from Tammy Tadd's store.  She sells these cute little stacks of 11" squares-she calls them "taddles".  I had a stack of 13 taddles, a fat quarter and a half yard of coordinating prints.  From that, I came up with this tree skirt!  If cutting into a quilt top sounds too daring for you, this would make a great table topper.

You could also use 4 fat quarters for the blocks and a 1/2 yard cut for the border.

For binding, you will need 1/2 yard for double fold binding.  The binding has to be cut on the bias, though, so a yard may be easier to work with.  Single fold binding would actually be the best to work with, but I would still get at least 2/3 or 3/4 yard because it must be cut on the bias.

You will need about a 45" square piece of batting.

The finished top should be about 41" square.  If your backing fabric is 44-45" wide, you will need 1 1/4 yards.  Make sure your backing is wide enough, though.

I used 2 - 1.5" covered buttons to close the tree skirt.  If you want to use smaller buttons, you will have to adjust the size of the button loops in the steps below.


To start with, I cut my fabric into a total of 16 - 8.5"x9.5" pieces

I then cut 2.5"x8.5" strips from the middle of the 8.5"x9.5" pieces.  Make sure that the long edge of these pieces is 8.5", NOT 9.5".  I stacked 2 or 3 pieces at a time to cut, but I wanted the blocks to all look slightly different so I was careful not to cut them all the same.  Where you cut the 2.5" strips from is up to you-just be sure to keep your cuts parallel to the edges of the fabric.
You can see in the picture above that all of my 2.5" strips on the left are the same size.  The other block pieces on the right are varying sizes.

Next piece a 2.5" wide strip to half of the remaining block pieces.

Now find the other piece to the block, and finish it up!

To create the quilt top, I pieced my blocks in a 4x4 pattern.  I also turned every other block so that the strips in my blocks went in alternating directions.  (I don't have a photo of my top before I quilted it, but you can see the pattern in the finished photo below.)

From my 1/2 yard cut, I cut 4 - 4.5"x WOF strips.  If you can't squeeze 4.5" strips from your half yard, just cut them at 4.25" or 4".  In a perfect world, my quilt top would be 32.5" square right now.  Make sure to measure before you trim your border strips, though.  Only cut 2 border strips to size for now.  After they are sewn onto opposite sides of the quilt and the seams are pressed, measure for your other borders.  Trim and add these borders in the same way as before.

Layer your top, batting and backing.  Quilt as desired.  I quilted straight lines, 1/2" apart, all in one direction.

Trim up the quilt so that all of the corners are square and the sides are straight.  I like to use a 12.5" square ruler for my corners and a 24" long ruler to trim my edges.

Now it's time to cut into your quilt!  (If you'd rather make a table topper, all you have left to do is bind your quilt!)  This isn't nearly as scary as it sounds.  I cut my quilt down the middle on one side, which made it easier than if I had chosen to cut from a corner on the diagonal.  I used a cup to mark the center circle, and then I made my straight cut along the seam line. I cut the center circle with scissors and the straight cut with my rotary cutter.  If you choose to cut the top from a corner on the diagonal, you just need to be sure that your cut goes through the block corners.  This will help keep your cut straight.

Your binding needs to be cut on the bias, because the center opening in the tree skirt is round.  I used double fold binding, but single fold would be a lot easier to work with around the center opening.

You will need 6 strips of binding fabric, at whatever width you choose.  Also cut a 2" x 10" piece of the binding fabric.  This will be the button loops, which are applied with the binding.

Sew the binding strips together and press.

To make the button loops, fold the 2" x 10" strip in half with right sides together and sew down the long edge.  Back stitch at the beginning and end of the seam.
Turn the strip right side out and iron flat.
Trim the piece so that your have 2 pieces, approximately .75" x 5".
Next, fold the strips in half and press the top folds so that they look like this:
 

Now you will need to pin the button loops the the straight edge that you cut into your quilt.  I placed my first loop 1" down from the center circle, and the next look 6.5" down from that.  These are arbitrary measurements, though, so place them wherever they look best to you!

When the loops are pinned in place, apply your binding!
This is what your loops should look like when they are sewn into the binding:


Now all you have left to do is sew down the binding on the quilt back and sew on the buttons!  I used 1.5" covered buttons, which work great with the large button loops.
 

The finished tree skirt:

I will have to take some pictures of it under the tree this Christmas.  It will probably look better there than on my driveway! :)

Tuesday, September 21, 2010

Eden Baby Stacks

Some friends of ours recently had a baby girl, and I decided to gift them a quilt.  I have quite the stash of charm packs, so I decided to make another Baby Stacks quilt.  I love the colors and prints in Lila Tueller's Eden-I think it's just perfect for a baby girl!  I chose one of the green prints for the borders, to help tone down the pinks and purples a bit.

Details:
Top and binding are Eden by Lila Tueller (charm pack plus 1 yard of 1 print)
Back is from the Loralie Harris Breast Cancer line
Finished size is 38" x 38"
Again I used some straight line quilting-I love the effect it gives the quilt after washing!

Front and back:
 

Some detailed pics:
 

I love using charm packs with 42 charms because I end up with a few extras.  I only needed 40 charms for the stacks, so the remaining pieces end up in my binding.  This is the second time I've done this, and I really like seeing the little bits of piecing in the binding!


Linked up to Quilt Story's Fabric Tuesday!

Saturday, September 4, 2010

Pumpkin Pie

I picked up a Pumpkins Gone Wild charm pack on clearance awhile back. (Holy cow, this line is from 2 years ago now!)  I've been trying to sew from my stash more, so I pulled these out to play with.
I added some Kona in snow (lattice pieces) and espresso (ruffle).

My original plan was to use paper foundations to piece these blocks, but it ended up being much faster to just chain piece. I started with 5" charm squares, which I cut in half once on the diagonal.  I then pieced the blocks back together with a 1" strip of Kona snow down the center.  I trimmed all of the blocks to 4.5" before sewing the blocks together.

I left the batting out of this table runner.  After basting the ruffles to either end, I sewed the backing on with right sides together, turned it right side out, and top stitched.  To keep the top and backing from shifting too much, I tacked buttons down at the seam allowances as shown.  I really like this technique, especially for table runners.  My table runners take a lot of abuse, which means they get washed often.  For a piece like this, that has no quilting to keep the layers together, the buttons work like a charm!  I can pull my table runner straight out of the dryer, no ironing needed. :)

A close up of the blocks and buttons:

I love this pattern with these prints.  It reminds me of slices of pie.  Because yes, I slice my pie into quarters. ;)