Sunday, July 31, 2011

Addy's Quilt!

Last week I was packing up a quilt to send off for a college friend's new baby. Addy wanted to know who the quilt was for, if she'd ever met the baby, etc. After a few minutes of discussion, she told me that she wanted to make the baby a quilt, too. I wasn't sure where we would end up.
This spring Addy made my brother a pillow for his birthday, and while it turned out really cute, making it was less cute. She didn't want to work on it for more than a few minutes at a time, and we almost didn't finish it when she lost interest before we were even half done.
But this time, she was determined! She chose fabrics from my stash before I even had time to get downstairs to help her. Then she told me which order she wanted them in, sewed them together (with some help and seam ripping to keep her seams straight-ish), chose her backing, and finished the quilt without any prodding! (We left out the batting and finished the quilt pillowcase style.) It did take us 2 days, but I only had to ask once and she was eager to start the project the second day.
 For a tag, I wrote Addy's name and the year on a piece of selvedge, which we tucked into a side seam on the quilt.
Addy was so proud of herself, and she insisted that we add her quilt to the package for my friend's baby even after I asked if she's like to keep the quilt for herself. I'm happy to say that the gift was very well received, and Addy's already talking about her next quilt!

Friday, July 29, 2011

Mail Organizer

I know I've linked to her before, but do you follow Anna at Noodlehead?
She has some really great tutorials, which I find myself browsing just about every time I need inspiration!
This time, I wanted to clean up the clutter in our house, so I made this mail organizer-from Anna's tutorial, of course!
I had some great fabric (Verna by Kate Spain) in my stash that plays well with the Posh (Moda) that is already in the kitchen. And now we are a tiny bit more organized!
I forgot to check that the fabric played well with the wall color, so now I'm wondering if I can learn to like the green fabric next to the (different) green wall. Hmmmm.

Thursday, July 28, 2011

Swap progress...

First up, the Make Mine Modern Swap:
I picked up some fabric for my partner-I decided to play it safe and buy something off of her wish list.
I also started working on the sewing machine cover for my partner. For this piece, I'm taking a risk. Her home dec style isn't as modern as her quilting style, but I know that she likes bright colors and contrast.
I'm going to make a few of these improv blocks and then lay them out and fill in the gaps with more white. I have a couple more ideas for items to coordinate with this piece. More to come. ;)
I went back to the drawing board on this one. I still love the Echino pouch that I showed last week, but it didn't seem to catch my partner's eye on Flickr. I'm not sure if she's busy, or a polite commenter who steers clear of the items that she doesn't care for. Either way, I went back to the info that I know about my partner, and Anna Maria Horner is her favorite designer. So I cut into my Innocent Crush stash!
I'm only going to give a sneak peak of this pouch for now-I'll do a full reveal of the pouch and it's contents once it has made it's way to my partner. I hope she loves it!
The details:
Fabric is Innocent Crush.
Lining is from Good Folks.
I used a quilter's linen on the back.
There are some hand quilting and hand embroidery details.
I'll post pics of the details soon!

Wednesday, July 27, 2011

Max and Whiskers for Max and Buster

The first time I saw the Max and Whiskers fabric was online. It was cute, but not something that I had to have right away. Then when I saw the line in person, I couldn't help but buy a charm pack! I thought it would make a great little quilt for my dogs, Max and Buster, to lay on, so one night I pulled it out and started sewing the charms together into pairs. I thought about sewing the pairs into 4-patches and including the last pair of charms on the quilt back, but I wanted to try out some new layouts. After a little playing, I had this:
 I really love this layout. I think I'll be using this in the future to make a quick baby quilt using a charm pack!
 I've been drawn to dense, straight line quilting lately. I also machine stitched the binding. Hopefully the dogs won't notice. ;)
 Such cute prints in this line!
This is my favorite print, which I used for the backing. I didn't have quite enough, so I added a strip of the dark grey (kona, medium grey) at the bottom of the quilt. I had a picture of the back, but it turned out blurry. Now that the quilt has been in use for a few days, it's too full of dog hair to try getting another picture!
Max and Buster are enjoying the quilt-it makes for a comfy alternative to the hard wood floors. And we've been using it to protect the seat of our new leather chair, as well!

Monday, July 25, 2011

Some more Little Birdie Stitches!

As usual, I haven't been keeping up well with these blocks. I just finished June and July, and the calendar is about ready to flip to August!
When I first started this block of the month, I stitched my blocks exactly as Little Miss Shabby stitched the samples. But as time has gone on, I'm getting brave about altering the designs slightly. Sometimes I simply omit details to keep the design simple (and quicker to hand stitch!), and in the case of the June block I did quite a bit of personalizing for this quilt's future recipient! I'm going to keep my June block under wraps for awhile longer, just in case the recipient stops by my blog.
I can still show my July block, though!
 Details!
(Click any photo to enlarge.)
And now, I will sit back and wait for August. :)

Sunday, July 24, 2011

Farmer's Wife Blocks

I know I haven't blogged about these recently, but I'm still sewing away! I have 14 blocks finished right now, so I think I'm pretty close to caught up with the group. I've decided to work on them at my own pace, rather than feel pressured to keep up. I also decided to work through the solids and fq set that I have, without stressing over how I will have enough fabric for all of the blocks. I may end up with a table topper, a lap quilt, or a bed quilt. Only time will tell. ;)
So, about those blocks! Here's what I've got finished at this point:
Blocks, left to right:
Row 1: Attic Windows, Autumn Tints, Basket, Basket Weave (I used an alternate layout from what's in the book)
Row 2: Bat Wing, Big Dipper, Birds in the Air
Row 3: Broken Sugar Bowl, Bow Tie, Box, Butterfly at the Crossing
Row 4: Buckwheat, Bouquet, Broken Dishes

Details:
Fabric is Holiday Happy by Monica Solorio-Snow (Happy Zombie!)
Solids are from the lqs, various manufacturers
Flickr group for Farmer's Wife Quilt Along

I'm really happy with how these blocks look when they are all together!

Friday, July 22, 2011

Pretty {Little} Pouch Swap - finished?

It took me awhile to get going on this pouch, because I was worried about what my partner would like to receive. But as soon as I got started, the pouch came together quickly! It looks a lot like I imagined, and I hope it's something that my partner likes. I'm anxious to see what the swap members say about the photos!
The pouch front, with zig zags!
Zig zag details:
The back:
Detail on the back:
 Lined with sun spots:
The main print is Echino.
I used scraps of Amy Butler, Valorie Wells, and Erin McMorris for the details. The blue/green print is a cross weave by Moda.
Finished size is 7" tall x 12" wide.
I have my fingers crossed that the swap members, and most importantly my partner, like what I've made! In the mean time, I have a few other ideas. And I think I'll sew up a little something extra to put in the pouch. :)

Wednesday, July 20, 2011

Pretty {Little} Pouch Swap!

My partner for this swap reminds me a lot of myself. Her mosaic is full of images that I adore, and she seems to love so many fabrics and styles! I pulled these fabrics based on a few things from her mosaic, and I have a couple of design ideas. What do you see when you look at this stack?
I thought some colorful zig zags would be fun, paired with some chunks of Echino and maybe a bit of hand quilting?

Tuesday, July 19, 2011

MMM Swap

The Make Mine Modern swap includes a fabric swap AND a handmade item swap-the best of both worlds!
 I pulled these fabrics for my partner's handmade item. Paired with a white background, I think they could make a fun sewing machine cover. What do you think?
(Grey and black prints are "WordPlay" by Michele DAmore. Green print is "Summer Dayz" by RJR Fabrics.)
I also have this stack. My partner seems to favor bright, springy prints right now. I think these fit the bill! I held off on prewashing these, because most people like to receive their fabric unwashed. But if my partner doesn't seem crazy about these, I'll just have to head back to the lqs. ;)

Sunday, July 17, 2011

Summer Swaps!

In the past, I never felt that I could join in a swap. We were so busy moving, unpacking, repacking, moving, etc. So I was really excited to catch a few swaps when they were still open for participants!
I was lucky enough to score a spot in the 2nd round of the Pretty {Little} Pouch swap and the Make Mine Modern swap!
Here's my inspiration mosaic for the Pretty {Little} Pouch swap:
PLPmosaic
See this link for photo credits.

And my Make Mine Modern swap mosaic:
MMMmosaic
Photo credits here.

I have some fabrics pulled as possibilities for my end of the swaps, and I think I have some good ideas of what to make. More soon!

Wednesday, July 13, 2011

A castle for the unicorn

For Addy's birthday, she received a cute unicorn pillow pet pee-wee (like the originals, but smaller!) from a good friend. Addy has wanted a pillow pet ever since they popped up everywhere last year, so this was a really special surprise for her.
Soon after the party Addy tried to explain to me that her unicorn needed a castle. I think she might have been confused by another brand of stuffed toy that was a unicorn that folded up into a castle? Either way, I thought it made sense for the unicorn to have a castle. If only I had the ambition to create a castle pattern. ;)
Instead, I remembered this min-tent pattern that I had bookmarked a few months ago. Plus I had some castle fabric....so with a little imagination, we have a castle-tent!
 I added a "drawbridge" which closed with the help of a little velcro.
 I over-estimated the size of the mini-tent (emphasis on the mini!), but unicorn does fit. We'll just have to keep her away from the powdered sugar donuts. ;)
 I added my label to the back.
 Here's the tent all closed up, with unicorn safely tucked inside!
Fabric is Castle Peeps by Lizzy House. (Did you catch the castle people inside the tent? You can see them best in the first picture.) The finished tent measures about 11" square at the base.
The tutorial calls for faucet connectors to use as tent poles. I sent Matt for those, and he came back with something slightly different. It seems to be working well, though!

Monday, July 11, 2011

Birthday party in a weekend!

Having just moved here, Addy doesn't have any little friends yet. But she really wanted a birthday party, and how do you say know to that?!? So in less than 3 days I made some quick decisions about what to make, buy, cook, etc. and had everything ready just in time for a few guests (yay for Matt's work friends and neighbors!).
Addy's favorite color is pink, and we found some pink and purple tissue paper to decorate with. So I spent the night before the party making this tablerunner:
Matt helped out my making all of the tissue paper pom-poms:
They make the room so festive!
Then I whipped up a few goodie bags for the kids. (No pink here! Boy bags were made from an Echino print with airplanes and girl bags were made from a FFAII print.)
Inside the bags I put a pencil, a snack bag, and a "kiddie portfolio" that holds crayons, paper, chalk, and a small chalk board:
I also picked up some beads and string for the big kids, and a safe toy for the little ones.
Toss in a little bit of grilling, some store-bought cupcakes, and some new toys to open, and we had a great party!
Happy 4th Birthday, Addy!

Friday, July 8, 2011

I spy winner!

According to random.org, the winner is....

Commenter #16, If Toys Could Talk!

I've sent you an email! Please get back to me with your shipping address.

Thanks to everyone for joining in, I'm not sure how to top the interest from this giveaway next month, but I'll try!

Wednesday, July 6, 2011

I guess I love a challenge!

Don't forget to head over here for the July giveaway!

When we moved to Seattle, we sold our living room furniture. Shortly after we got here, we started searching for a couch. We told ourselves that we'd buy something cheap, but we should have known better. We ended up at a really nice furniture store down by Pike Place, where we were drooling over a new leather couch. We've had 2 leather couches in the past, and we love them because they are so comfy and easy to clean! But we didn't really want to spend a fortune on a new couch when we just spent so much on the move.
The sales woman told us about a lavender couch that they had in the outlet store, so with nothing to lose we headed over there. The couch was most definitely lavender. But also oh-so-comfy! And such nice leather. So we bought it. Yep, we bought a lavender couch. I talked myself into it by claiming that I could beat this home dec challenge!
I decided to sort of ignore the color of the couch and treat it like a neutral. I went to my stash and found some Sugar Pop, which was perfect with it's subtle purple elements.
I started off planning to make very simple pillows with a flange, like this one (minus the awesome hexagons). So I headed to the basement around 11pm to "whip up" a few simple pillows. But I couldn't leave good enough alone! So I added some ruffles, a bound edge, and a hidden zipper. Several hours later, I had 2 pretty pillows!
(I love how my Central Park quilt looks on the couch, too!)
 For this pillow, I sewed a tube of the coordinating print, turned it right side out, and ruffled it with my ruffler foot before adding it to the pillow front.
 To make the accent on the second pillow, I cut a wide piece of the coordinating print, pressed the long edges under about 1/4", then ruffled each long edge with my ruffler foot. I sewed the ruffled piece down on the pillow along each long edge, and then went back and sewed a few lines down the middle, alternating the direction that I sewed to create more texture.
 Simple ruffle:
 Textured panel:
 Label!
 I used an invisible zipper, which I also hid under a 3/4" flap to protect the couch from the metal zipper pull.
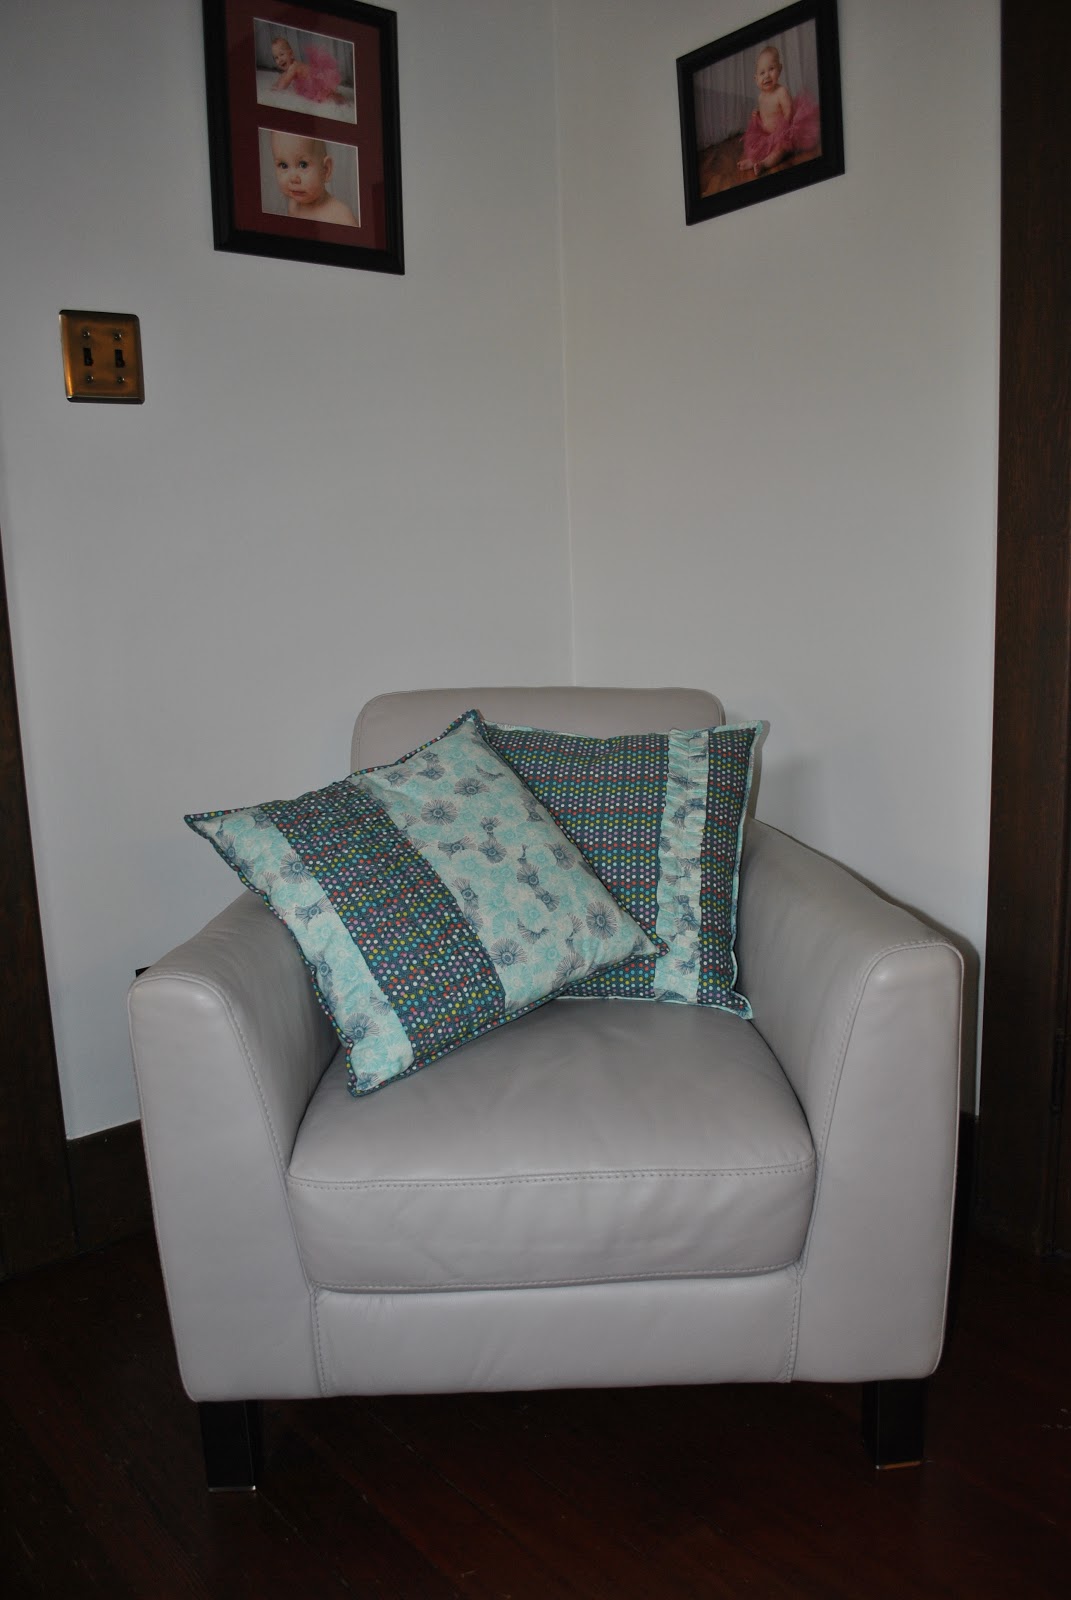
 This last weekend we decided to head back to the same furniture store to catch the tail end of their anniversary sale. We found a grey chair and couldn't pass it up! It's so comfy, it was a great price, and it was the last one so we got to take it home that day! It even looks great with the pillows.
A few details about the room... The walls are a very light blue. We have a few cream accent pieces, so I didn't want white or cream walls.
The coffee table is from the same store, below there's a better picture of it. The two ends are upholstered in leather, and they flip up to store things. The center area is wooden. It's the perfect ottoman/coffee table combo!
I just ordered some cute new Erin McMorris fabric from here to make one of these fun gum drop pillows. I'll update with some pics when I have the pillow done! I'm trying to mix a few fabric lines so that the living room doesn't look too matchy matchy. :)

Monday, July 4, 2011

I Spy....the July Pay It Forward giveaway!

Thanks to everyone who entered, this giveaway is now closed! Stop back in August for another Pay It Forward giveaway.

Did I ever mention that I hate odd shaped fabric scraps? I cut all of my scraps into 5" squares. Anything smaller than that is put in a bag, which I usually pass along to a scrap-loving friend.
For the July giveaway, I sorted through my scrap charms and chose 2 sets of 25 charm squares. I focused on pieces that would work well for an I Spy quilt:
The two sets are identical, and I tried to chose an equal amount of boy and girl prints. Keep one and share one with a friend!
To enter the giveaway, just leave me a comment! I will leave comments open until Thursday, July 7th. Winner will be announced on Friday, July 8th!
International peeps are welcome to enter!