Supplies to create 1 Modern Dresden Plate block:
20 - 5" charm squares
1 yard background fabric
Dresden Plate wedge template* - I used the EZ Dresden Ruler
Paper Pattern Pieces for the background (see below - let me know if you have any questions or troubles downloading the files)
Edited to add: Paper Pattern Pieces can also be found here.
It has come to my attention that people are unable to download through Scribd without paying for a membership. You can now find the needed templates here in my craftsy shop. The files are FREE to download! Please do not share the downloads, but rather direct others to my Craftsy shop and/or my blog. Thanks!!
It has come to my attention that people are unable to download through Scribd without paying for a membership. You can now find the needed templates here in my craftsy shop. The files are FREE to download! Please do not share the downloads, but rather direct others to my Craftsy shop and/or my blog. Thanks!!
*Using the EZ Dresden Ruler, my Dresden Plates each contain 20 wedges. The template that you use will dictate how many wedges you will need per plate. See the instructions included with your template.
To create the paper pattern piece for the background, download the 3 PDF files from Craftsy, print each piece at 100%, and piece the templates together along the dashed lines. (More details below.) I can not guarantee that this template will fit your dresden plate unless you use the EZ Dresden Ruler that I used.
I am using a charm pack of Little Apples and Kona in Ash for my Modern Dresden Plate.

I chose 20 charms from my charm pack - because I was using a light grey background, I left out the grey charms. I like the look of this design when there is contrast between the prints and the background.
From your background fabric, cut 40 3"x5" pieces. If you want the wonky look of the Mod Christmas mini, you will need to cut these pieces larger; 5" square should be large enough.

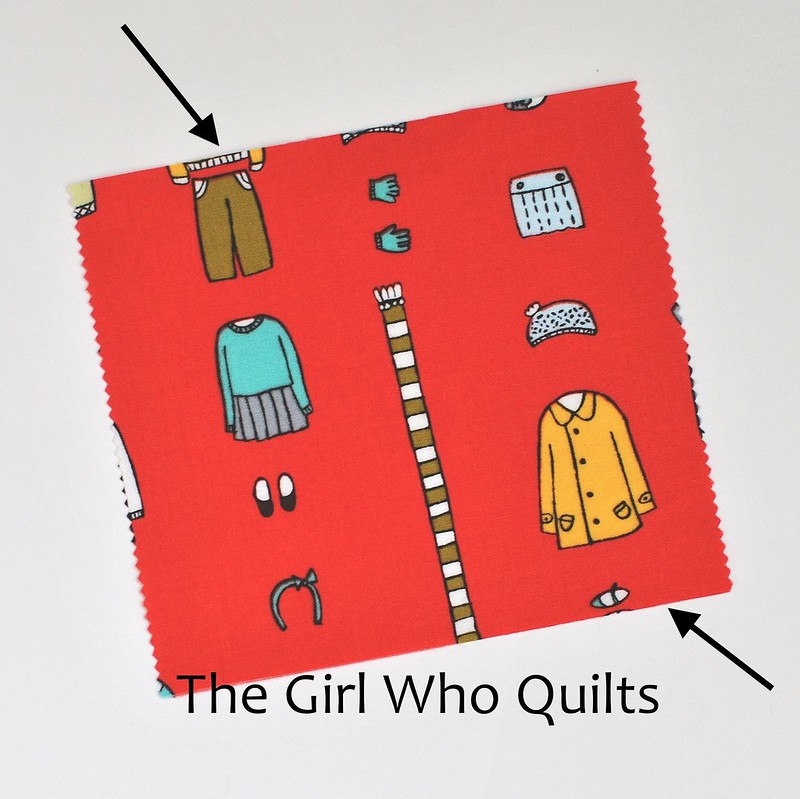
Now trim your charm squares by cutting 2 parallel edges of each charm (the width of the charms should remain uncut at 5"). Cut the charms to several different sizes - variety creates visual interest! Don't cut any charms smaller than 2.5"x5", though.
* For the Mod Christmas quilt, I cut the edges at odd angles. I didn't measure anything, I just laid down my ruler however I liked and cut a clean edge with my rotary cutter.
* For the mini quilt that I entered in the Dresden Challenge, I cut my charm squares so that the 2 cut edges were parallel.
How you cut these edges will dictate how your finished Modern Dresden Plate looks!
The arrows in the picture below indicate the 2 parallel edges that I cut.
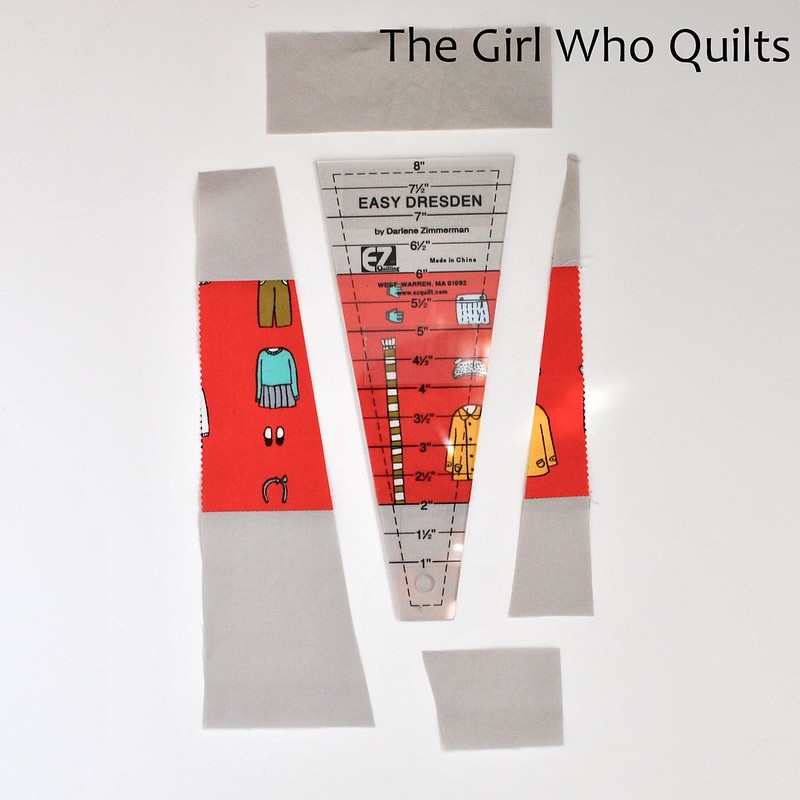
Now piece a 3"x5" rectangle to either end of each charm, along the edges that you just trimmed. Press your seams; I like to press my seams open.
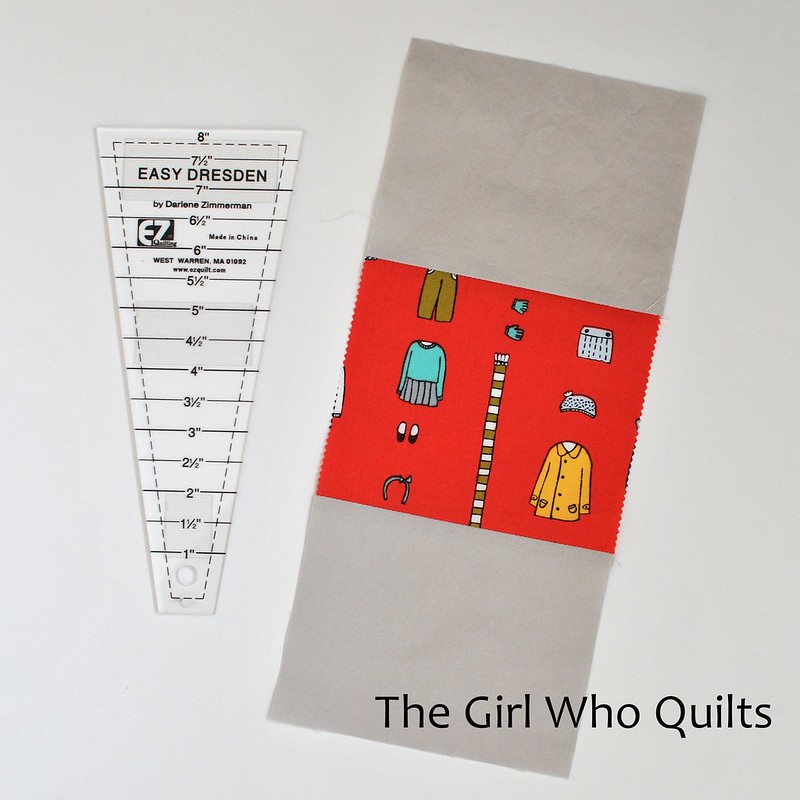
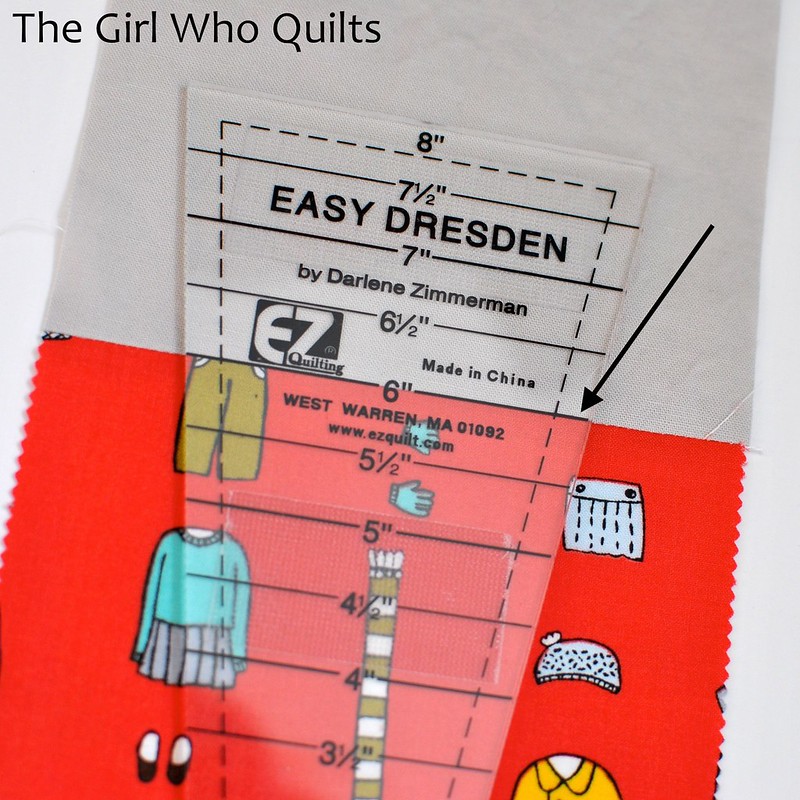
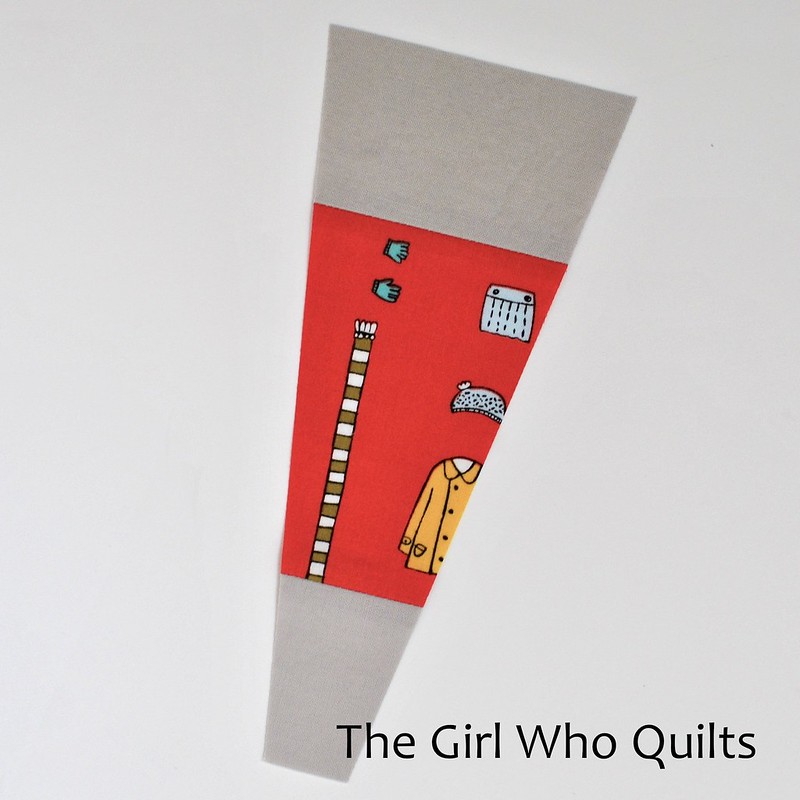
Now cut your wedges! If you chose to cut your charms wonky, there will be no seams to line up. If you cut your charms straight, use the lines on your wedge ruler to ensure that you cut the wedges straight. Try not to cut every wedge the same way - again, variety creates visual interest!
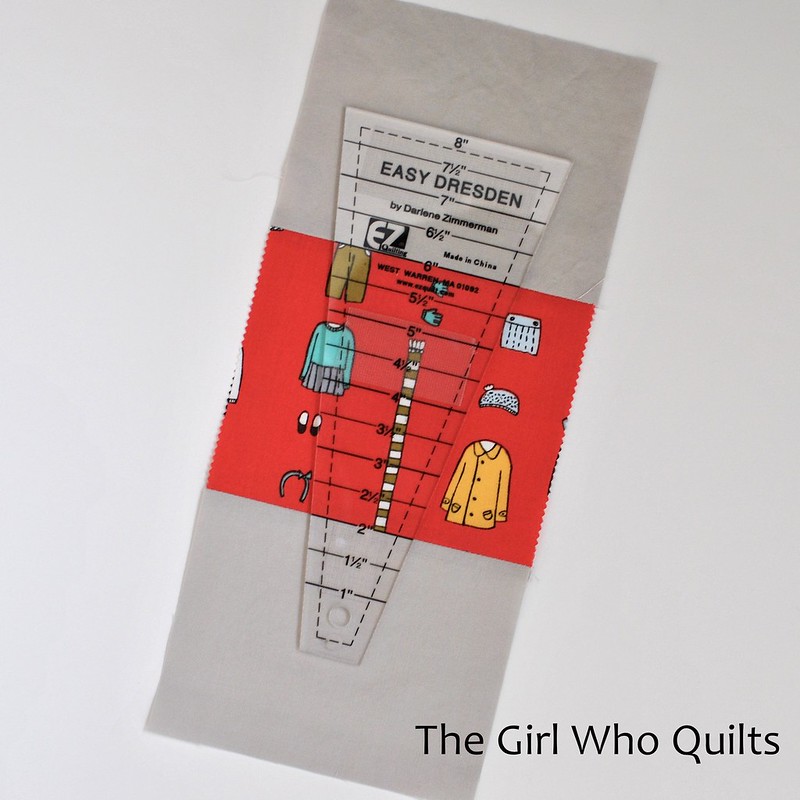
To cut this wedge, I aligned the 6" mark on my ruler with the top seam of my piecing. See the arrow below:
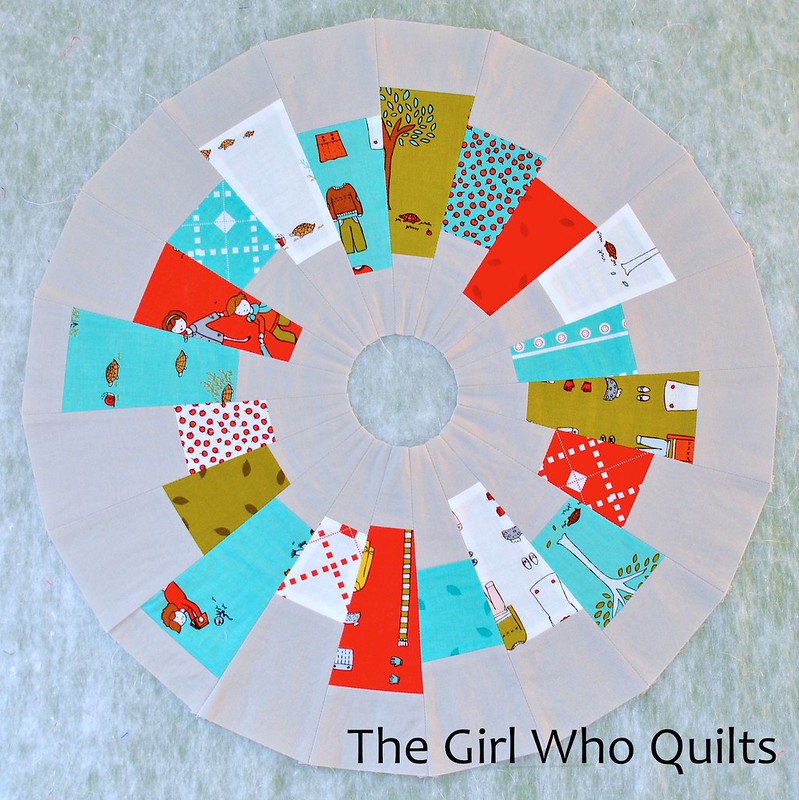
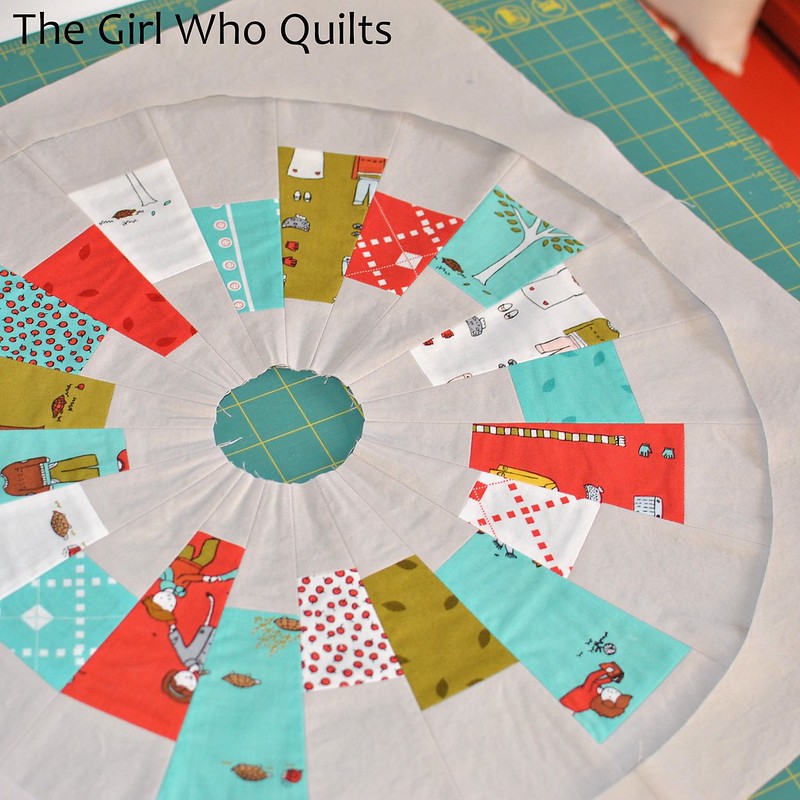
When all of your wedges are cut, piece them into a ring.
Now we will need to create the paper template for the background. If you're not comfortable sewing a curve, you could applique the dresden plate onto a piece of background fabric. Below I've included instructions for piecing the dresden plate.
Print the 3 pieces for your template. Be sure to print them through Adobe Acrobat, and print at 100%. I can't ensure that the pieces will be the correct size if they are printed another way.
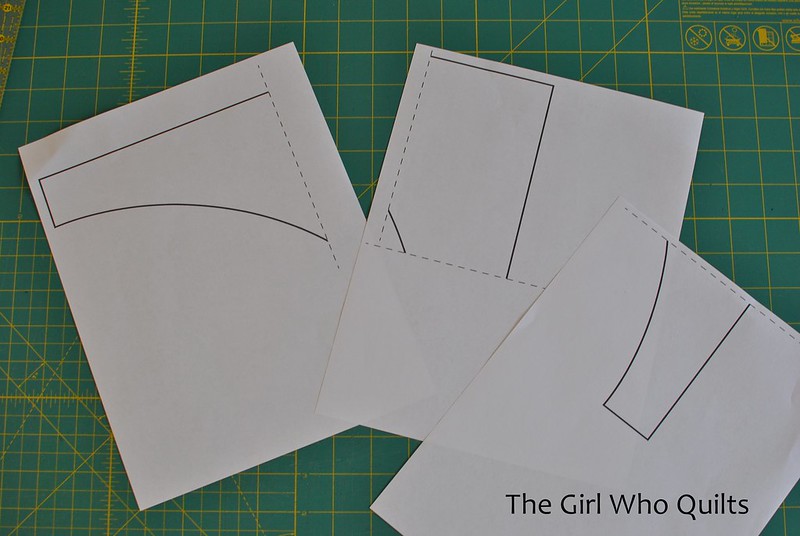 Now, piece the template together along the dashed lines. At this point, the long edges of the template should measure approximately 10 1/2" - 10 5/8". If your template is a different size, check your printer settings.
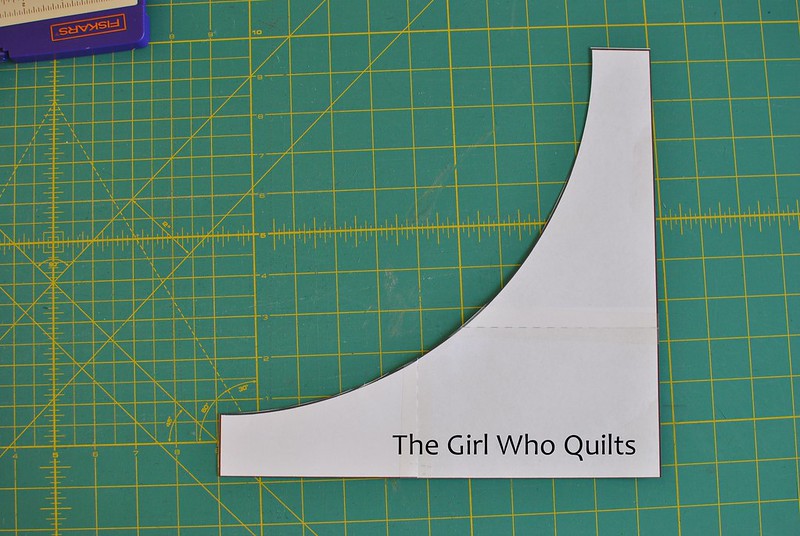
Cut 4 pieces of background fabric using your paper template. Piece these 4 pieces together along the short ends.
Here's where we will piece the circle. It's not hard to do, but it is very helpful to pin A LOT and sew slowly!
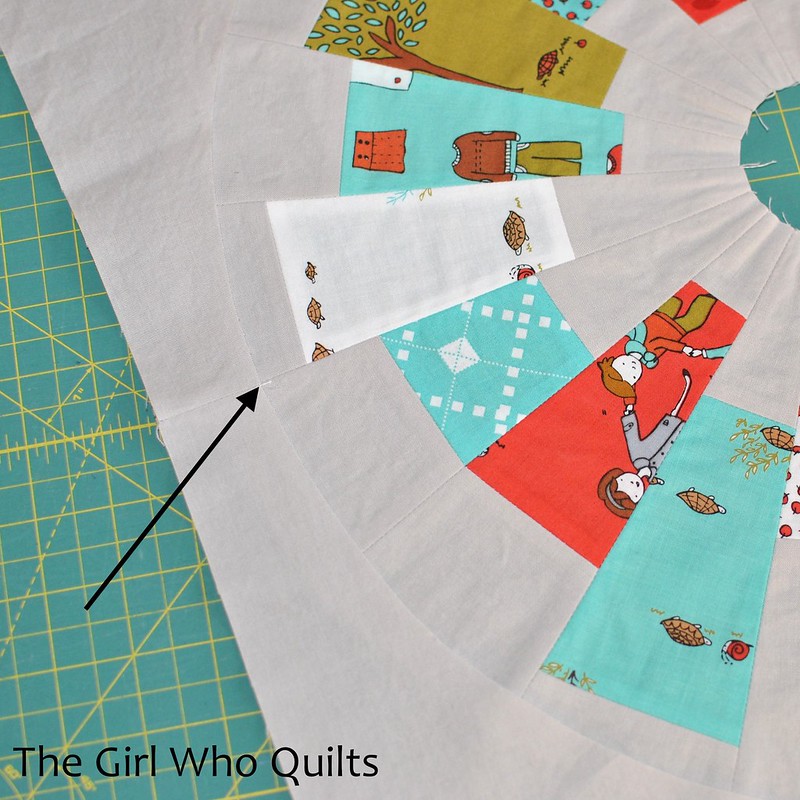
Lay the dresden plate down on a flat surface, right side up. Lay the background piece, also right side up, on top of the dresden plate. Align the 4 seams of the background piece with 4 seams on the dresden plate.
The arrow in the following picture indicates where I aligned the seam on my background piece with a seam on the dresden plate.
Now turn the edge of the background piece so that the ridge side is facing the dresden plate and pin in place. Begin by pinning at the 4 seams, and then ease the rest of the circle into place. I like to pin at all 20 seams along the dresden plate.
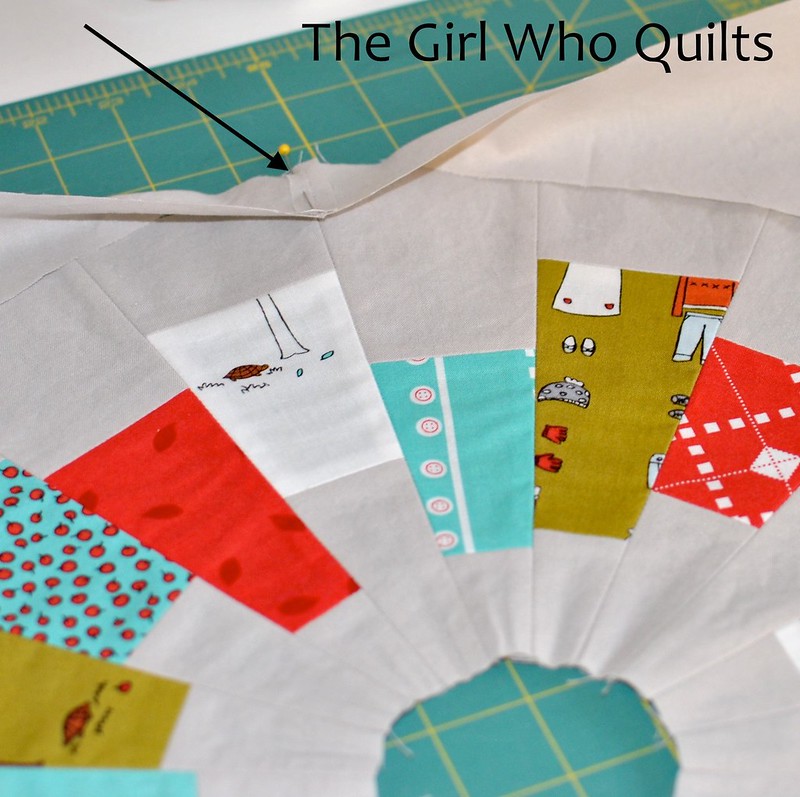
Here is my piece after I pinned all of the way around the plate:
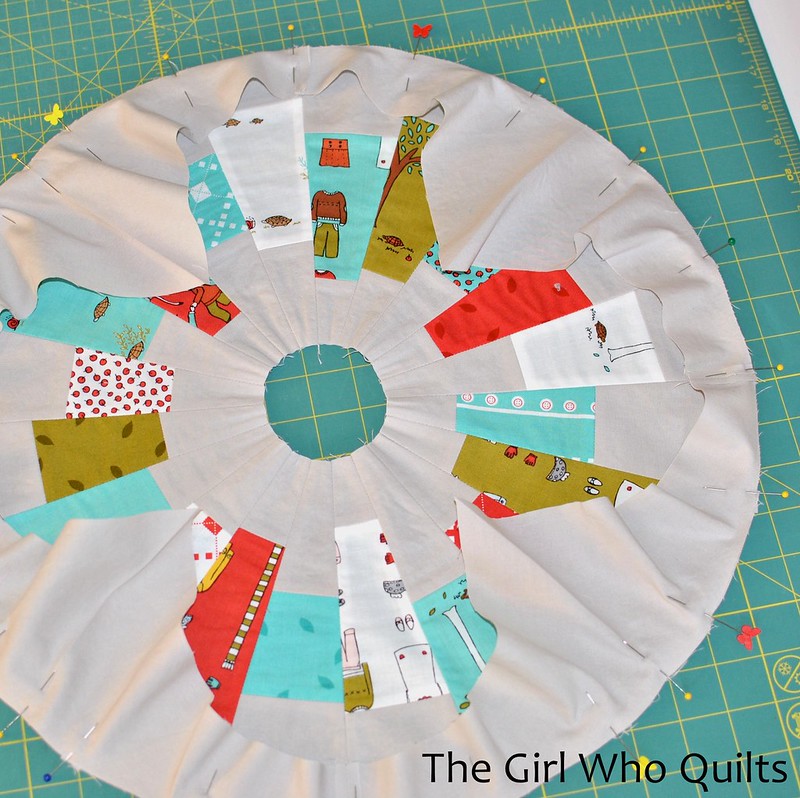
To sew the curve, begin at one of the pins. Slowly sew using a 1/4" seam from one pin to the next, keeping the raw edges of the dresden plate and the background fabric even. I like to use the "needle down" function on my machine. You are essentially sewing 20 straight lines, which will result in a full circle!
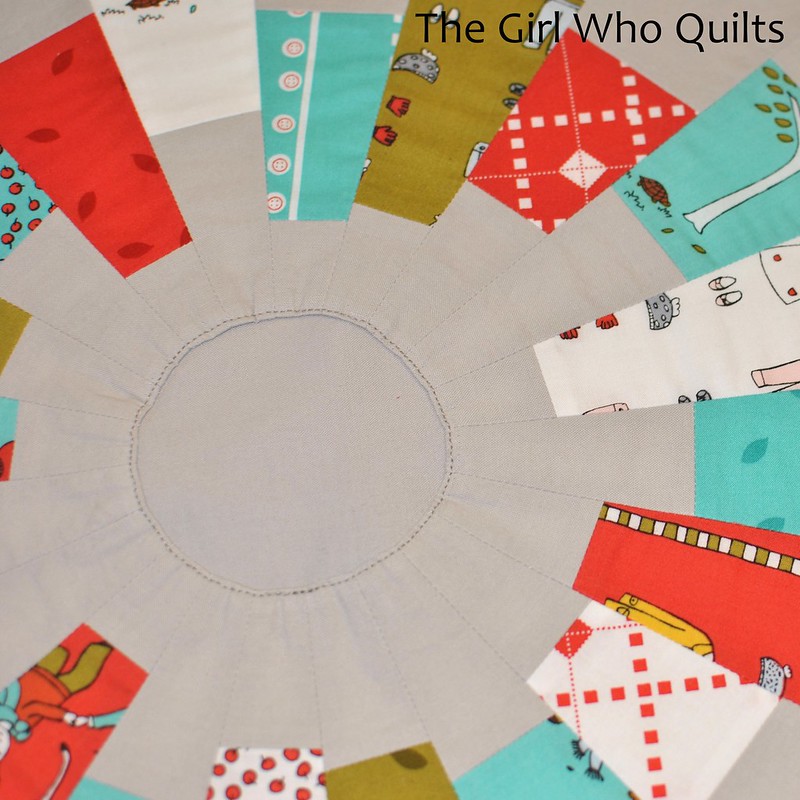
Press this seam to the background fabric.
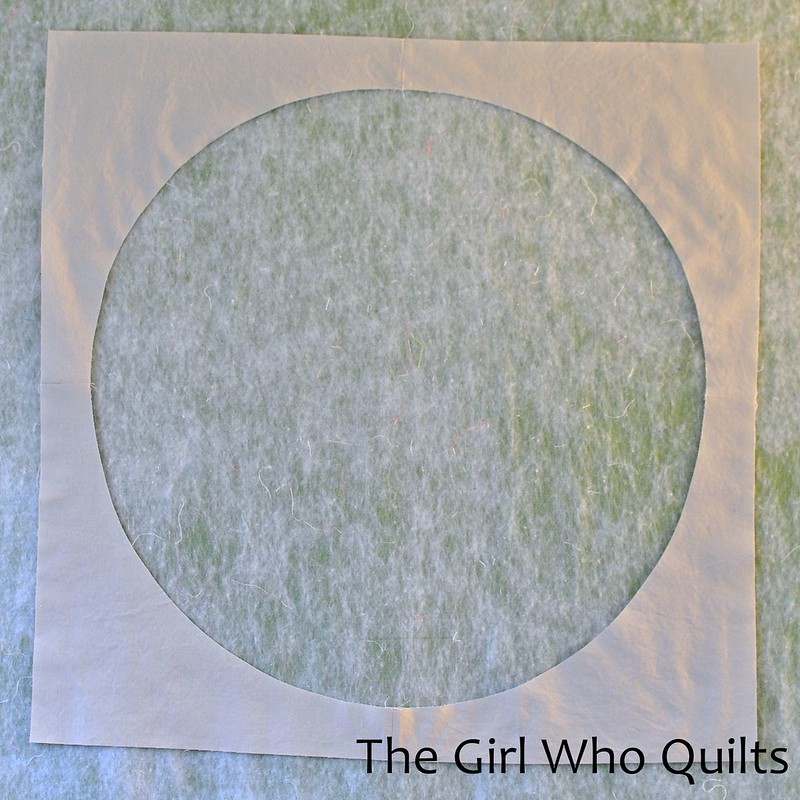
To finish the inner edge of the dresden plate, I like to use applique. For this tutorial (and on the Mod Christmas mini), I used a piece of background fabric. You could also use a charm square for this.
Cut a piece of my background at 5" square, or use a left over charm square.
Press the raw edge of the inner edge of the dresden plate under by 1/4".
Place the 5" square, right side up, under the dresden plate and pin around the turned edge.

Sew a straight stitch close to the turned edge.
You've completed your first Modern Dresden Plate! Piece several of these blocks together to create a larger quilt, or baste and quilt a single block to create a mini quilt. If you use this tutorial, I hope you'll share your creations! Feel free to add pictures to the flickr group.
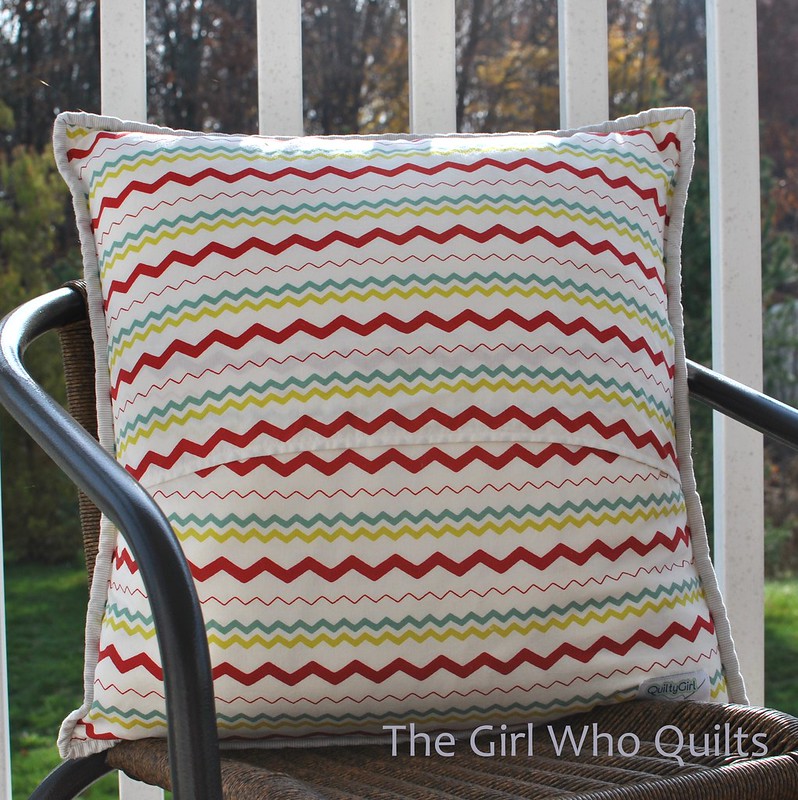
I finished this block with some outline quilting and added an envelope closure and some binding to create a 20" pillow. I think this pillow would be a great addition to a child's reading nook!


I've added this pillow to the shop.
Feel free to contact me with any questions!
And also, a huge thanks to my sister for creating the PDF templates for me, just 2 weeks before her wedding! :)
I am using a charm pack of Little Apples and Kona in Ash for my Modern Dresden Plate.
I chose 20 charms from my charm pack - because I was using a light grey background, I left out the grey charms. I like the look of this design when there is contrast between the prints and the background.
From your background fabric, cut 40 3"x5" pieces. If you want the wonky look of the Mod Christmas mini, you will need to cut these pieces larger; 5" square should be large enough.
Now trim your charm squares by cutting 2 parallel edges of each charm (the width of the charms should remain uncut at 5"). Cut the charms to several different sizes - variety creates visual interest! Don't cut any charms smaller than 2.5"x5", though.
* For the Mod Christmas quilt, I cut the edges at odd angles. I didn't measure anything, I just laid down my ruler however I liked and cut a clean edge with my rotary cutter.
* For the mini quilt that I entered in the Dresden Challenge, I cut my charm squares so that the 2 cut edges were parallel.
How you cut these edges will dictate how your finished Modern Dresden Plate looks!
The arrows in the picture below indicate the 2 parallel edges that I cut.
Now piece a 3"x5" rectangle to either end of each charm, along the edges that you just trimmed. Press your seams; I like to press my seams open.
Now cut your wedges! If you chose to cut your charms wonky, there will be no seams to line up. If you cut your charms straight, use the lines on your wedge ruler to ensure that you cut the wedges straight. Try not to cut every wedge the same way - again, variety creates visual interest!
To cut this wedge, I aligned the 6" mark on my ruler with the top seam of my piecing. See the arrow below:
When all of your wedges are cut, piece them into a ring.
Now we will need to create the paper template for the background. If you're not comfortable sewing a curve, you could applique the dresden plate onto a piece of background fabric. Below I've included instructions for piecing the dresden plate.
Print the 3 pieces for your template. Be sure to print them through Adobe Acrobat, and print at 100%. I can't ensure that the pieces will be the correct size if they are printed another way.
Now, piece the template together along the dashed lines. At this point, the long edges of the template should measure approximately 10 1/2" - 10 5/8". If your template is a different size, check your printer settings.Cut 4 pieces of background fabric using your paper template. Piece these 4 pieces together along the short ends.
Here's where we will piece the circle. It's not hard to do, but it is very helpful to pin A LOT and sew slowly!
Lay the dresden plate down on a flat surface, right side up. Lay the background piece, also right side up, on top of the dresden plate. Align the 4 seams of the background piece with 4 seams on the dresden plate.
The arrow in the following picture indicates where I aligned the seam on my background piece with a seam on the dresden plate.
Now turn the edge of the background piece so that the ridge side is facing the dresden plate and pin in place. Begin by pinning at the 4 seams, and then ease the rest of the circle into place. I like to pin at all 20 seams along the dresden plate.
Here is my piece after I pinned all of the way around the plate:
To sew the curve, begin at one of the pins. Slowly sew using a 1/4" seam from one pin to the next, keeping the raw edges of the dresden plate and the background fabric even. I like to use the "needle down" function on my machine. You are essentially sewing 20 straight lines, which will result in a full circle!
Press this seam to the background fabric.
To finish the inner edge of the dresden plate, I like to use applique. For this tutorial (and on the Mod Christmas mini), I used a piece of background fabric. You could also use a charm square for this.
Cut a piece of my background at 5" square, or use a left over charm square.
Press the raw edge of the inner edge of the dresden plate under by 1/4".
Place the 5" square, right side up, under the dresden plate and pin around the turned edge.
Sew a straight stitch close to the turned edge.
You've completed your first Modern Dresden Plate! Piece several of these blocks together to create a larger quilt, or baste and quilt a single block to create a mini quilt. If you use this tutorial, I hope you'll share your creations! Feel free to add pictures to the flickr group.
I finished this block with some outline quilting and added an envelope closure and some binding to create a 20" pillow. I think this pillow would be a great addition to a child's reading nook!
I've added this pillow to the shop.
Feel free to contact me with any questions!
And also, a huge thanks to my sister for creating the PDF templates for me, just 2 weeks before her wedding! :)