Tuesday, August 30, 2011

Flourish!

Have you been reading Lee's blog at Freshly Pieced? She shares lots of inspiring projects, and she recently hosted the Supernova quilt along. Along with her awesome quilting talent, Lee is a graphic designer! (Can't you tell by her amazing blog design??)
Lee has a really big project going on right now, she entered a design contest over at Connecting Threads. There are only two days left to vote, so if you haven't done so already, hop over here and vote for Lee's fabulous design, Flourish!
(It's in the fourth row down, far right!)

Monday, August 29, 2011

Go Anywhere Bag by Anna at Noodle Head!

A few weeks ago Anna contacted me and asked me to test a new bag pattern. I love Anna's style, and I jumped at the idea! Here's my version of the Go Anywhere Bag, sewn up in 1,001 Peeps by Lizzy House.
Bag Front:
 Detail shot, I used piping at the top of the pockets:
Pocket Pleating on the bag front: 
 Bag Back:
 Detail:
 Back pocket with magnet closure:
 Bag interior, held closed with a sew-in magnet!
 Interior Pocket:
 I added a zip pocket:
I love my bag so much, I made a zippy wallet to match! 
 Wallet back:
This bag was really fast and easy to sew up. I love the large exterior pocket on the back (perfect for my Jo-Ann's flier and grocery store coupons!). The 3 pockets on the front give the bag some fun personality, and they are a great place for a cell phone, sunglasses, and keys! The interior pocket keeps little things like chapstick from floating around in the bottom of the bag. The bonus to all of these pockets is the extra fabric combo possibilities! I was able to use all of my favorite 1.001 Peeps prints in this bag.
The wallet was a really fast finish, and I like it's simplicity. (And did you know that it's a free tutorial on noodlehead??)
After a few weeks of using them, I still love my bag and wallet. What a great combo of fun and functional. :) If you'd like to make a Go Anywhere Bag of your own, head over here!

Thursday, August 25, 2011

Mendocino Pillows!

I've had 2 of these pillows stored away for over a year now. Wow, time flies! Now that are all settled in Seattle and ready for Addy to move into a big girl room, I found some motivation to create a third and final (for now?) pillow. So, here goes!
First, I created this strip pieced pillow:
 Pin tucking!
 Some ric-rac and quilting details:
 Pillow back:
 Piping!
 Another detail shot of the front, I did some wave quilting in the yellow seahorse strip:
Next, I made a bolster pillow. This was so much easier than I thought it would be! I started by piecing a rectangle with my selvedges and leftover strips of fabric:
 I did some dense, straight line quilting:
 Then I sewed the piece into a tube with a zipper running down it. Once the fabric tube was done, I stitched on the circular ends. It sounds a bit complicated, but it really was simple and easy!
You may have already seen pics of the third pillow in this scrap tutorial. Here are a few pics of it:
 The back:
Now we just need to finish putting together Addy's room! I will show more pics when we are done - I think it's going to be my favorite room in the house!

Monday, August 22, 2011

A Tote for me!

We are well beyond the diaper bag phase, but I still like to have a tote with me when we are walking around the city. My purses are either too small or uncomfortable to carry for very long, so I starting dreaming up a new tote.
I wanted something simple and fun, but most importantly I wanted a tote that was *mine*! I needed a bag that I could use when I'm out with the family, and also a bag that I could toss my stuff into as I head out to meet my running partner.
After a little bit of window shopping at my favorite (overpriced) stores and some careful investigation of the totes on display at the local quilt shops, I came up with this:
It's a simple tote, 12" tall, 15" wide and 5" deep. I used a laminate for the interior, the bottom of the bag, and the exterior pocket (all fabric is Echino). It was tough to decide how to use the laminate: to protect the bag exterior from dirt and the elements, or to protect the interior for my sweaty running clothes. Protection from sweaty clothes ultimately won out, and I was able to cut carefully so that I had enough laminate for the exterior bag bottom as well!
The exterior pocket is 7.5" tall by 11" wide, divided into 2 compartments.
Inside the bag I added a zippered pocket and a tab closure with a magnetic snap.
The straps are just shy of 30" long. I made the straps by covering some 1" webbing with Echino. I was hoping to have enough laminate for the straps, which wasn't the case. I think the fabric straps will still hold up well, though.
 I added my label to one side of the tote.
I toyed with the idea of using a binding to finish off the top edge of this tote. I think it would have made the bag look more polished, but I worried about how to neatly finish the bag straps. It's much easier to cleanly tuck the straps into the top seam and add some topstitching for durability!
I've used this bag for a trip downtown on the bus and several running "dates" now. It seems to fit my needs really well!

Monday, August 15, 2011

A Gum Drop Pillow

A few weeks ago I stopped at a new-to-me quilt shop for some thread, and found a few Gum Drop Pillows made up. I picked up this pattern for a dollar when a lqs was closing a few years ago, but never saw the pillows in real life. Well, after one look at them, I was full of ideas for fabric combinations!
We could use some sort of ottoman/extra seating in our living room, and I thought one of these would be fun in some Summersault. First I wanted to make a prototype, so I pulled out my Castle Peeps stash and sewing up this fun pillow for Addy!
I found the pattern really easy to work with, though I did make 1 small alteration. I added a zipper in one of the seams, which is really handy for stuffing the pillow...and restuffing if it flattens a bit! I also thought I could pull the stuffing out and wash the cover if need be.
I'm hoping to start on the pillow for the living room soon, but first I'm going to research my stuffing options. Fiberfil is not dense enough for the pillow to be used as a seat or a footrest, yet the bean bag chair filler is really pricey!
A bonus to the pattern: if you don't stuff it full, it makes a great bean bag chair! My dog enjoyed the half-stuffed pillow for several days before I had a chance to buy more fiberfil. I'm thinking about making the dogs their own pillow out of a laminate. Easy wipe down and dog hair won't stick to it!

Editing to add: I hated how the poly-fil made the pillow lumpy with use, so I made a liner for the pillow and filled the liner with styrofoam bean bag filler. The pillow is much more comfy and visually appealing now! (I used a liner so that if the pillow outer happens to come unzipped, I won't have a mess of tiny styrofoam balls all over my house!)

Saturday, August 13, 2011

Don't Scrap Your Scraps! Project 5: Using Charms and Other Large Scraps

For the 5th and final scrap project, I have another quilt to share! I made this quilt from a charm pack, but it could easily be made from any large scraps. My scraps are conveniently cut into 5" squares, so I may use this as a scrap buster in the future!
I began by piecing my scraps/charms into long strips. I used 4 strips for this quilt, 3 on the front and 1 on the back. With my strips pieced, I chose a coordinating solid for the front and back. On the front I used a quilter's linen in straw, and on the back I used a similarly colored kona.
With my fabrics chosen, I played around with arranging the pieced strips until I was happy with the design. I only had a yard of my quilter's linen, so that limited my size and layout (not to mention I think I cut my quilter's linen wrong 3 times. There's a reason I included 3 strips in the quilt top!)
When I had the top pieced I felt that something was missing, so I grabbed a few coordinating charms and appliqued the recipient's name in the lower righthand corner. (Ignore the goofy sun spot over the name!)
The back is a kona solid, I quilted straight lines about 1" apart, and used a green print for the binding:
 This quilt finished at 36.5" x 39.5".
Fabric is Plume by Tula Pink.
Quilter's linen for the top and Kona for the back.
Thanks for following along as I sewed through some of my scraps! I still haven't quite been overcome by the scrap-saving bug, but it is fun to see these ideas sewn up. I think my favorite projects were the improv blocks from the first quilt and the mendocino pillow, and I can see myself sewing more of those from some of my favorite scraps!

P.S. Zoe was also the recipient of Addy's first quilt!

Wednesday, August 10, 2011

Don't Scrap Your Scraps! Project 4: Raw Edge Patchwork Pillow

I think this is my favorite scrap project so far! I came up with this pillow as I was brainstorming for small project ideas, and we also happened to be working on Addy's big girl room.
If you've been following along on my blog since last summer, you'll remember the 
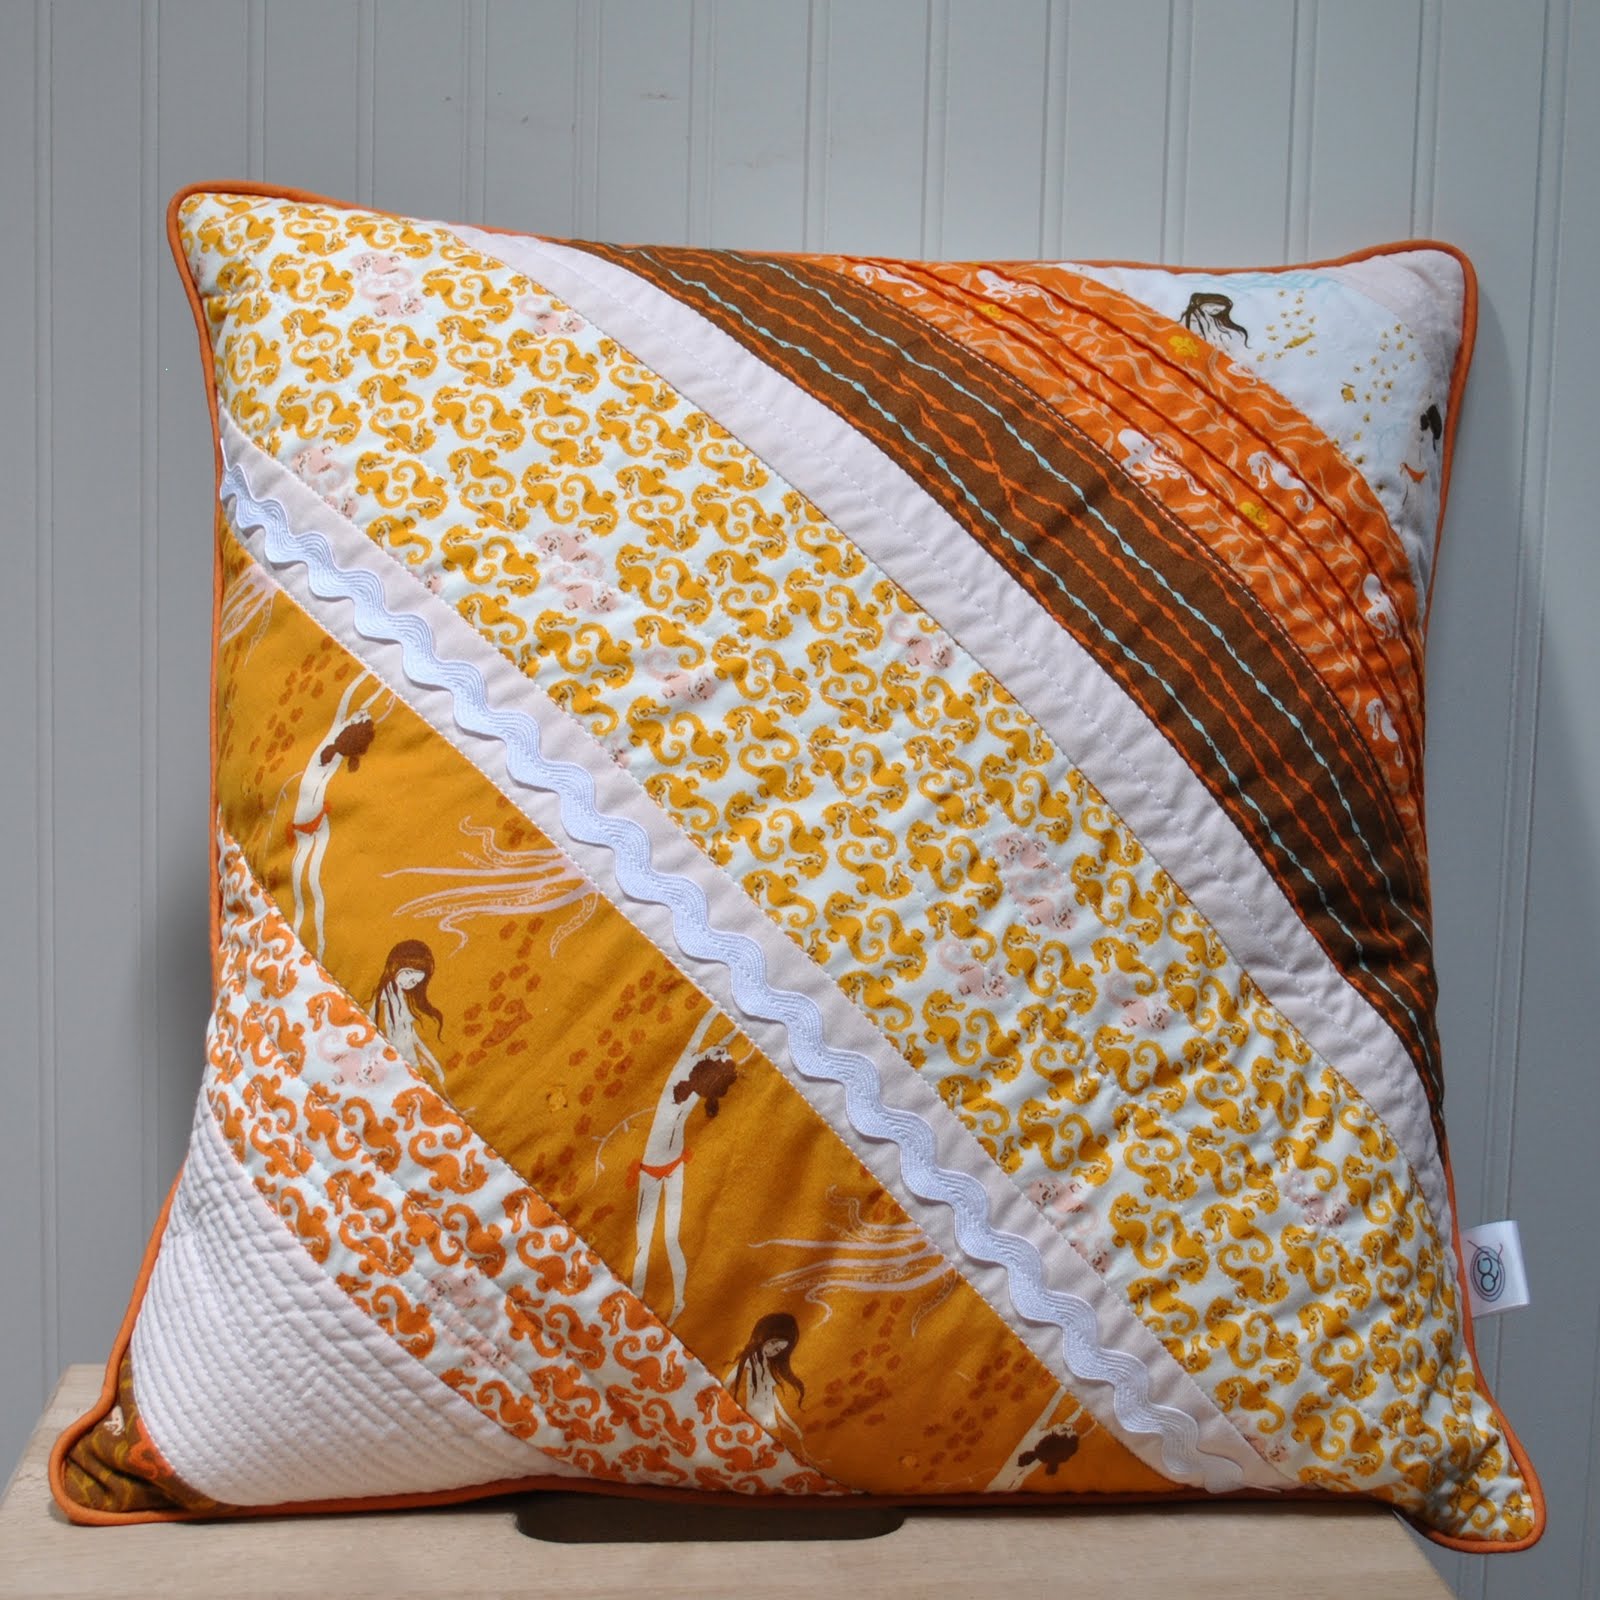
mendocino quilt that I made for Addy. You also might remember me babbling about some mendo pillows....which I promised to share and never did! Well, with the addition of this pillow I think I'm ready to share the set of 3.
But not today. ;) Today I'll just share this one, along with a tutorial. I'll share the others soon, and once we manage to acknowledge that our little girl is growing up and needs a full size bed, I will do a full reveal of her room!

Supplies:
Neutral background fabric, 1/2 yd should be enough for a pillow. If you want to quilt the pillow front and back, allow for up to a yard.
Scraps, trimmed to size. I cut all of my scraps to 3" sq with the except of one 6" sq piece.
Pillowform - you choose the size!
Basting spray or pins (I used spray)
Batting (optional)
Zipper (optional)

Note: My inspiration for this project came largely from Amanda Jean (Crazy Mom Quilts) and her ticker tape quilt. If you don't already read her blog, check it out. She's amazing!

To start, cut a piece of your neutral background to the size of the pillowform. Don't allow for seam allowances-this ensures that your pillow looks nicely stuffed when finished:
 Next draw a grid on your fabric, depending on the size of your scraps. I drew a 3" grid, b/c my scraps were cut to 3" square (with the except of 1 piece that I cut to 6" sq.) It's a bit hard to see the grid in this pic, I drew it on with light blue chalk pencil. Click to enlarge the pic:
 Take your background square outside and give it a good spray with basting spray (or skip this step if you don't want to use basting spray). Also, ignore my very dirty patio. (Ewww!) I placed 1 square down in this pic, to help you see the grid that I drew:
 Now take your sticky background piece inside and place your scrap squares however you'd like (if you're not using basting spray, simply pin your scraps into place):
 I like to quilt my pillows, so I layered my pillow top with a piece of batting and some backing. Pin basting works well for small pieces like this:
 Now let's sew down those scraps! I just sewed 1/4" in from the raw edges. You can sew around each piece individually, or sew down the columns and across the rows. I chose to do the later:
 Now you can finish your pillow however you'd like. I quilted the back pieces and added an exposed zipper. For a simple pillow, try an envelope style back.
When your pillow is finished, toss it in the washer and dryer to fluff up the raw edges.
Ta-da!
 Look at those soft, fluffy edges (you can also get a better idea of how I sewed my pieces down in this pic)! Love it!
 Katie Jump Rope by Denyse Schmidt goes really well with the colors in Mendocino (by the most fabulous Heather Ross)! My pillow back, including some wavy quilting lines like I did on the mendo quilt:
 Now go play with your scraps! And I promise, I'll do a full reveal of the mendo pillows soon. ;)

Sunday, August 7, 2011

Don't Scrap Your Scraps! Project 3: Using Extra Blocks

This project is another quilt, but this time I used some left over blocks for part of my top. I had a few blocks left from my Central Park quilt, and I didn't know what to do with them. I wanted to use the animal print from the fabric line, but my lqs didn't have the right colorway.
I started off by sewing all of my blocks into 1 row and added a small strip of the yellow kona from my postage stamp blocks along either long edge. (Each block was 10" finished to start, I sewed 5 blocks together and later trimmed that to about 42".) Then I headed to the lqs to find something that would play well with the yellow in my pieced strip. I bought about 1.25 yards of a Central Park print, added a large chunk to the bottom of my pieced row and a slim strip to the top, and I had a quilt top!
For the backing, I went back to the animal print that I had wanted to use on the front. I pieced a few charm squares into 4-patches, set them off with strips of white (just like I did for the back of my Central Park postage stamp quilt), and added that to the bottom of the animal print.
I finished the quilt with meander quilting and the most perfect orange pin dot binding.
 I hand stitched one of my larger labels on this quilt. I think I like how it looks!
 Finished size just shy of square, at 41" x 42".

Wednesday, August 3, 2011

Don't Scrap Your Scraps! Project 2: Scrap Art

This is the easiest scrap project. Ever.

Supplies:
Itty bitty scraps that you can't bear to part with
Glass jar with lid

How to:
Open jar.
Insert scraps.
Close jar.
Stand back and admire!
I got this idea when I was working on my City Weekend Baby Boy quilt. I've never been so attached to a little pile of scraps, but for some reason I just couldn't toss these! The bigger scraps became improv blocks, and the little bits are now art!

Monday, August 1, 2011

Don't Scrap Your Scraps! Project 1: Improv blocks

Welcome to "Don't Scrap Your Scraps"! I had a few projects lined up to blog about when I realized that they all had something in common - scraps! I thought I'd blog about them in series. I'm not going to post full tutorials for most of the projects, because these are more improv in nature. But feel free to ask any questions along the way. Here we go with the first project!

If you've been following along since earlier this year, you probably saw my City Weekend baby boy quilt. When I finished this quilt top I had a small stack of scraps that I couldn't part with-which is a big deal for me! Typically I chop my scraps into 5" squares and anything smaller is set aside to donate.

I pulled out my City Weekend scraps and decided to try some improv piecing. I had enough fabric for 3 8.5" (finished) blocks. Once I finished the blocks, I headed to my stash for a background fabric. I found some quilter's linen in grey, which paired with the City Weekend really well.

Using 1 yard of quilter's linen as a starting point, I pieced the top with the 3 blocks running down one side.
For backing I kept it simple with Kona charcoal.
The quilting is simple straight lines, which I achieved by sticking a large strip of masking tape down on the quilt sandwich and stitching with the edge of my quilting foot next to the tape. (I do not recommend sewing on the tape!)
I don't know if I love the improv blocks or the binding more! I used a print from the Make Life collection by SweetWater. Such a perfect print for a baby quilt! Finished size is 36" x 39".
Stay tuned for more scrap ideas!