Sunday, February 27, 2011

The nemesis

These guys are not crocheting up nearly fast enough!
And now Itsy Bitsy Spider has the bomb bird pattern in her etsy shop. Ack!

Here's the run down if you want the patterns:

The patterns are very well written and easy to follow. I just wish the finished products were a bit smaller. I'd prefer if the size of the blue bird (see the etsy pics) was the size of the largest in the set.

I've got the goldfinch nearly done, so he'll be around here soon!

Friday, February 25, 2011

Hello Betty

Nope, not the fabric line. Betty is my sewing machine! :) I never properly introduced her, so I thought I do a little review today.
Last fall I sold my quilt frame and started to relearn quilting on my sewing machine. It was pretty easy to pick back up, and I was happily meandering in no time. I did feel limited by the 7.5" throat on my machine, though, so I started look at my options. I had tested the Horizon when it first came out, but it was a "just for fun" test drive. We were just starting to think about moving to Seattle and I was still hoping to bring my frame with. Not to mention, I was a die hard Bernina girl!
Now with the frame sold I was rethinking the Horizon.  I also took a visit to my Bernina dealer to see the 820. I quickly decided against the 820 based on price (or maybe I should say Matt made that decision for me, ha!). So back to the Horizon dealer I went, armed with questions. I played around with the free motion quilting and the acufeed, plus I tested out the thread cutter and other gadgets. I was really happy with the results, so the machine stay in my mind. I went back home and started negotiating with Matt. And the Saturday after Thanksgiving we bought the Horizon! I hadn't sold my Bernina yet, but I was working on it. I just couldn't pass up the deal that my dealer was offering. ;) (I did later sell my Bernina, phew!)

Here's my review:
Purchased: November 2010
At: quiltfabric.com
What I like:
*It's so quiet!

*All of the stitches are printed on the machine lid, making it very easy to navigate the folders on the touchscreen
*Storage area under the lid
*Auto tension (small dial to the right of the take up lever in the photo above)
*11" harp

*Great even feed for piecing without having to use a walking foot or acufeed
*Acufeed system is great for quilting and sewing with stretchy or thick fabric
*Extra high lift!
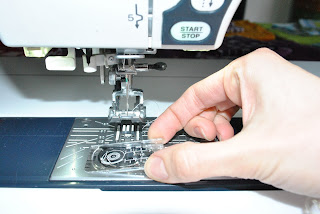
 (Removing the bobbin cover)
*Easy drop in bobbin and clear window to monitor bobbin fullness
*Good lighting under the machine

*Automatic Plate Converter system - red arrow points to plate converter, which slides back and forth to change to and from single hole plate
*Thread cutter is very quiet
*Easy to clean bobbin case
 (Bobbin case removed for cleaning)
(Bobbin case back in place)
*Quilting feet. Open toe, clearview and standard. This foot system does not hop like a traditional darning foot does, but rather it skims the quilt top. I prefer this system.
*Easy to access machine head (for when the stray thread is stuck somewhere....)
g*Optional table - setting the machine down in the table makes sewing and quilting so much easier!
*User friendly (see more below)
*Many accessories come with the machine (15 feet!)
*Acrylic table is great for travel to classes and sew ins
*Accessories are reasonably priced

What I dislike:
*The accessory tray. This slides onto the free arm, but if you are using a table or the acrylic table it is just another piece that takes up space. Right now I keep it on the floor behind my table, but I think I'm going to find a better way to store the accessories and pack the tray away.
*The foot pedal seems cheap, but it does it's job.
*It's a bit tedious to switch to and from the acufeed or quilting foot, because they are not just snap on feet.
*Buttonholes seem to sew out a bit too long
*Manual is lacking in information
*Touchscreen is not high resolution

It definitely took me some getting used to, because I was transitioning from one brand to another. But overall I'm very happy with the switch. I think that Janome does a good job of spending money where it matters, and it shows in the products. They also include more accessories with their machines, which I appreciate. (For example, my machine came with a cording foot!)

I love the stitch quality and the size of the harp, but another thing that I really love about this machine is that it allows the user a lot more freedom to adjust settings. Such as:
presser foot presser
auto tension or manual tension
feed balancing (great for button holes and decorative stitches when not using acufeed)
dual feed balancing (to ensure that both layers are being fed evenly)
bobbin winder fullness adjustment

I know that my previous machine had some of these adjustment options, but they were hard to find and use, imo.

There are lots of other features on the machine, most of which I just don't use often. I very rarely use a decorative stitch. The machine has the great ability to customize stitches and program combinations, that's just not something that I use. It also has 3 monogram alphabets, which I use occasionally. I like that I have the choice of 3 styles.

To see more about the machine (and better pictures!): http://www.janomespecials.com/newmc/index.html

(This is a review containing my opinions. I purchased the machine, and received nothing in return for this review.)

Oh, and about my machine's name! My husband used to drive a 1986 Chevy Celebrity stationwagon when we were in college. He claims that when it was brand new, the exterior was a maroon color. But by the time I knew him, it was decidedly a dusty rose color. I named her Betty, and it stuck. Before we graduated, we bought a new car and Betty was passed on to Matt's brother. And to this day the whole family refers to the late wagon as Betty! So when I saw the maroon faceplate on this machine, I knew what name I had to give her. ;)

Wednesday, February 23, 2011

Little Red-the final Christmas gift!

While I was wandering through Target one day, I was struck with inspiration for my friend, Stephanie's, Christmas gift. She has these goofy woodland creatures in her sewing room, and right there on the shelf at Target was a tiny hedgehog! I bought the little guy and took him home with me, where he sat for a few days. And then one late night I remembered some adorable Little Red Riding Hood scraps that I had left over. So I stitched up a mini quilt and a red cloak for the hedgehog cutie. This turned out even cuter than I could have imagined!

 Seriously, how can you resist those sweet little eyes? And I have to admit, I'm more than thrilled that the cloak turned out so cute on my first attempt!
Another gift that is hard to part with - I must be on a creative streak this Christmas!

Sunday, February 20, 2011

A Spring Wreath

Every year after the Christmas hustle we have a few weeks before my mom's birthday, my mother in law's birthday, and then my father in law's birthday! It's hard to come up with gift ideas so soon after the holidays, so this year I pulled out some of my books for inspiration.
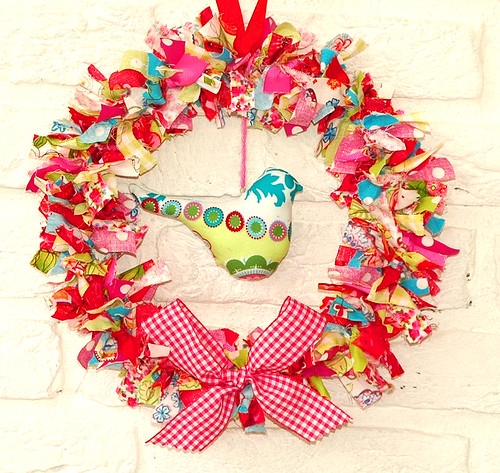
I love this book, everything in it is just so cute! Neither my mom or mother in law are bird lovers, but I managed to find inspiration despite that! I found this wreath and decided that it would be the perfect spring accent for a front door:
Fabric wreath with birdie1

I pulled out a bunch of colorful fat quarters that had been sitting in my stash for far too long. The first wreath used up all of the strips that I had cut, so for the second wreath I cut into my batiks. I forgot to take a pic of the batik wreath before I gave it to my mom, but here's a pic of my mother in law's wreath:
This was the smallest hoop at my JoAnn's, and after tying all of those strips I wish it had been smaller. It's not so big that it wouldn't fit on a front door, though, so it works. :)

I also made up a few reusable birthday bags:

Now, what to make for my father in law?

Saturday, February 19, 2011

Fandango, baby!

I think I was a bit late to the Kate Spain party, but that's ok. A few months ago I picked up a Fandango charm pack on a whim. After I had a chance to thumb through the stack of prints, I realized how much I like this line. So when I found more charm packs in Seattle, I bought another one. And as much as I wanted to keep these pretty pieces all to myself, I thought they would make a great baby girl quilt.
 Simple patchwork. I had a yard of 1 print from the line-the perfect amount for a border and binding!
 Snow!
 To balance the simple pathwork, I did some heavy fmq in a paisley pattern. Not perfect, but I'm ok with the result.
 Another shot of the quilting on the back.
I even machine-bound this one. Sssshhhh, don't tell the quilt police!

The details:
Top and binding are Fandango
Backing is Kona in pale flesh
Quilted in an all over paisley design, which took me about 4 hours to complete!
Approximately 43" x 52"
Bound entirely by machine (I feel like I need to say that twice for some reason!)

I sent this quit off to an old grade school friend who is expecting her 3rd baby, and her 2nd girl. I hope she likes it! I gave her quilts for her first 2 children as well, but I think this one is my favorite. :)

PS I'm linking up to Modern Monday at Canoe Ridge Creations and Fabric Tuesday at QuiltStory!

Wednesday, February 16, 2011

Yarn Projects and Etsy Finds!

With Matt home for the holidays and a few road trips to my Mom's house, I finished a few knitting and crochet projects! I don't spend much time knitting or crocheting, but I usually have a WIP for road trips and the occasional tv night. So my projects are slow to finish. :)


This first project is a neckwarmer that I originally found at the yarn shop Nina in Chicago a few winters ago. One of the girls at the shop designed the pattern, and I just couldn't get it out of my head! So when I found the right yarn for this project at I'd Rather Be Knitting, I knew I had to make this project. (Pattern is free on ravelry!) This knit up really fast and I love the look of the herringbone pattern!

(Sorry about the horrible pic!)


This next project was an impromptu project for Matt. Last week this Angry Bird post popped up in my reader, and I knew I had to have those crochet patterns! Amigurumi is about the only thing I crochet, and it's SO fun! It usually takes small amounts of yarn, and I'm a sucker for anything cute. I started the cardinal Angry Bird on a trip up to my mom's and finished it Superbowl Sunday. It took me a bit to get back into the crochet rhythm, but with the first one done I have 8 more to go! I want to make the goldfinch and pig for Matt, plus my brother and one of his friends would each like a set. I've started on the rest of them, and they seem to be going quickly. So stay tuned for the rest of the bunch! In the mean time, the cardinal is on Matt's desk in Seattle. (Good luck to his coworkers, I hope they don't blame me when they see the bird flying out of his office door!)


The red and black yarn used here is Red Heart acrylic. The orange is Plymouth Yarn wool/acrylic blend, and the white is Plymouth Yarn cotton.

And now for my etsy finds!

il_fullxfull.194226195.jpg
(Photo courtesy of Moxie Madness.)
Moxie Madness was nice enough to screen print a tunic for me! I found this tunic in their shop a few weeks ago, and never got around to buying it. I sent them a message, and they immediately offered to make one up for me! I love the style of this top, and it fits perfectly! (As an added bonus, Moxie Madness is based in Bloomington, IL which is just down the interstate from us!)

I think I found this etsy shop around the holidays. I love the idea of a yarn bowl, so I added the shop to my favorites. Last week while I was browsing etsy I decided to see what was new in my favorite shops, and that's when I found this bowl. It's just so cute, I couldn't resist it! I used it a bit the other night while I was working on the Angry Birds, and I found it to be really useful. No more rolling yarn ball! The bowl is so pretty, I might leave it out in my living room. The colors are perfect, and maybe I'll get a little more hand work done!

OK, enough with the yarn and shopping. I need to get quilting!

Monday, February 14, 2011

My Sleepover Bag

A few years ago I made myself the Amy Butler Weekender Bag. It was not an easy project, and I think it sat in my closet for several months before I finished it. I've used it tons, but there are a few little things about it that I was never satisfied with. I always planned on making another one, until I found the Sleepover Bag pattern by Melly and Me. I love the whimsy of the Melly and Me patterns, and the bag looked pretty easy to construct. So into my stash the pattern went. ;)
Then at the end of last year we were getting ready to visit my parents for the holidays. It was after Christmas so all of my gifts were made, and I was itching to sew something for myself! I happened across the new Amy Butler Soul Blossoms line at the lqs, and decided I needed my new bag. In three days. (I needed it for the trip to my mom's, of course!) Yeah, I have these impulses a lot.
I had to include my new rainboots in the picture. My parents bought them for me for Christmas, and I think I've worn them every day since they arrived! Besides, they match my bag. :)

The pattern was really straightforward and easy to follow. All of the pieces are quilted before assembly, and everything fits together really well. The technique used to attach the lining results in no raw edges inside the bag, which is my kind of bag! The handles are made using 2 thicknesses of batting, giving them that poofy look that usually requires cording. The front of the bag has 2 pockets which close with magnetic snaps (and they are the perfect size for a phone charger!). And my most favorite part is the bottom corners!
I love how the corners are boxed out and used as a design detail. And it makes a great place for a label! (The bag ends lay better when the bag is full. I didn't stuff it quite enough for the photos but my clothes for a weekend trip fill it out just about perfectly!)

The pattern does not call for any interior pockets. I almost included a zipper pocket, but decided that I wouldn't use it. I visit my mom every few weeks, so I'm a "seasoned" weekend traveler. Inside my weekend bag I keep a toiletry case with most everything I need for a trip. Anything extra that I decide to pack goes in the toiletry bag as well, so I'm not sure what I'd put in a bag interior pocket.

I'm really happy with the bag, and I will definitely turn to this pattern again in the future.
P.S. I'm linking up to Sew Modern Monday over at Canoe Ridge Creations today!
P.P.S. I'm also linking up to Fabric Tuesday over at Quilt Story!
Joining the Linky Party for Travel Handmade!
Travel Handmade with The Sewing Summit


Friday, February 11, 2011

The methods to my madness

I'm working on my postage stamp quilt right now, and I realized that I've developed a system for piecing that is working quite well. I thought I'd share it with you, and maybe save you some time when piecing your projects!
One of these tips I picked up from reading "The Practical Guide to Patchwork: New Basics for the Modern Quiltmaker". Before I started this quilt, I read Elizabeth Hartman's suggestion to press seams open. I've pieced a few projects this way, but I wasn't totally convinced until I started working on the postage stamp quilt. It really does increase your piecing accuracy and create very flat seams and blocks!

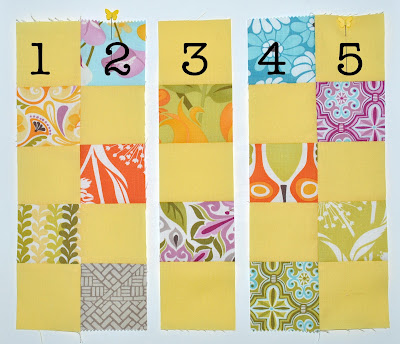
So, here's my process for creating the blocks. I've numbered the columns from 1-5 for ease of explanation. As you will see, I pressed my seam allowances open on my strip sets as well as all subsequent seams.

 Lay out your strips in whatever order you'd like.
Place a pin at the top of the 2nd and 5th strips, these are just markers. (I am using yellow butterfly pins.) 
 Pin columns 4 and 5 together, and be sure to match up your seams. Keep the pin in the top of column 5. Once you have the method down, you can easily chain piece and the marker pins really help keep everything straight.
 Notice that my seams are pressed open. I place my pins through the seam allowances just before the seam. This helps to keep the bottom seam allowance from flipping over as your machine feed dogs pull the fabric along.
 Sew the seam that you just pinned. I wait until my seam has started to feed under the presser foot before I remove the pin at the seam. This helps to ensure that your bottom seam allowance doesn't flip on you. I tend to sew these at a medium speed, and I can typically just slow down my sewing to pull the pins out without having to stop.
 Press your seam open and lay your pieces in place. Remember that your maker is at the top of row 5.
Pin columns 1 and 2 together. Keep your marker pin in column 2. 
 Again, I pin through the seam allowances just before the seam to help keep my seam allowances down.
Sew the seam that you just pinned, press your seams open, and lay your pieces  in place. Remember that your marker is at the top of column 2.
 Now pin your 1+2 piece to your #3 column.
Again, pin just before the seam allowance to hold your seam allowances open. 
 Sew the seam that you just pinned, press your block, and lay your pieces together again. Remember to use your markers to keep your pieces in order.
 Pin your 1+2+3 piece to your 4+5 piece.
Sew your last seam, remove your marker pins, and press your seam open. Look at that nice, flat block! 
 Seam allowances pressed open on the back.
Look how flat everything is!

I found that I had much less stretching when I pressed my seam allowances open. This was especially evident when I subcut my strips into 2.5" pieces, and it certainly helped to keep my blocks straight and flat, too!
I also had an easier time lining up my seam allowances. In the past, I would alternate the sides that I pressed to so that my seams locked together as I pieced. But I often ended up with mismatched seams anyway!
Another change that I've made is to pin more often. I didn't pin the first postage stamp block that I made, and I wasn't very happy with the results. Plus is took me awhile to sew the seam, because I had to keep stopping to guide my seam allowances and keep them from flipping over.

To make the process go smoother, I chose to lay out several blocks at a time. Then I would go through and pin my markers and 1+2 and 4+5 units. (I could do all of this while watching tv, too!) By the time I had the piecing process worked out, I was able to lay out, pin and sew several blocks at a time. I also waited until the entire block was assembled before pressing my seams, but that is a bit harder to work with than pressing as you go along.

If you want to try chain piecing, you may find it easier to use 1 pin at the top of column 2 and 2 pins at the top of column 5 to keep your pieces in order.

And now I've shared a little more about my crazy, type A habits. I hope that I've helped you rather than scared you away. ;)