One of these tips I picked up from reading "The Practical Guide to Patchwork: New Basics for the Modern Quiltmaker". Before I started this quilt, I read Elizabeth Hartman's suggestion to press seams open. I've pieced a few projects this way, but I wasn't totally convinced until I started working on the postage stamp quilt. It really does increase your piecing accuracy and create very flat seams and blocks!
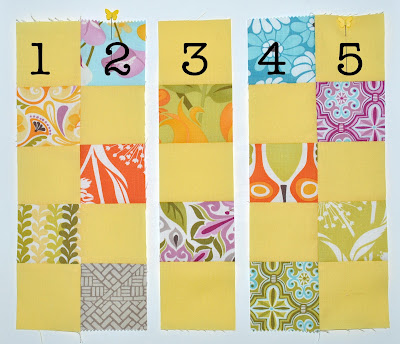
So, here's my process for creating the blocks. I've numbered the columns from 1-5 for ease of explanation. As you will see, I pressed my seam allowances open on my strip sets as well as all subsequent seams.
Lay out your strips in whatever order you'd like.
Place a pin at the top of the 2nd and 5th strips, these are just markers. (I am using yellow butterfly pins.)
Pin columns 4 and 5 together, and be sure to match up your seams. Keep the pin in the top of column 5. Once you have the method down, you can easily chain piece and the marker pins really help keep everything straight.
Notice that my seams are pressed open. I place my pins through the seam allowances just before the seam. This helps to keep the bottom seam allowance from flipping over as your machine feed dogs pull the fabric along.
Sew the seam that you just pinned. I wait until my seam has started to feed under the presser foot before I remove the pin at the seam. This helps to ensure that your bottom seam allowance doesn't flip on you. I tend to sew these at a medium speed, and I can typically just slow down my sewing to pull the pins out without having to stop.
Press your seam open and lay your pieces in place. Remember that your maker is at the top of row 5.
Pin columns 1 and 2 together. Keep your marker pin in column 2.
Again, I pin through the seam allowances just before the seam to help keep my seam allowances down.
Sew the seam that you just pinned, press your seams open, and lay your pieces in place. Remember that your marker is at the top of column 2.
Now pin your 1+2 piece to your #3 column.
Again, pin just before the seam allowance to hold your seam allowances open.
Sew the seam that you just pinned, press your block, and lay your pieces together again. Remember to use your markers to keep your pieces in order.
Pin your 1+2+3 piece to your 4+5 piece.
Sew your last seam, remove your marker pins, and press your seam open. Look at that nice, flat block!
Seam allowances pressed open on the back.
Look how flat everything is!
I found that I had much less stretching when I pressed my seam allowances open. This was especially evident when I subcut my strips into 2.5" pieces, and it certainly helped to keep my blocks straight and flat, too!
I also had an easier time lining up my seam allowances. In the past, I would alternate the sides that I pressed to so that my seams locked together as I pieced. But I often ended up with mismatched seams anyway!
Another change that I've made is to pin more often. I didn't pin the first postage stamp block that I made, and I wasn't very happy with the results. Plus is took me awhile to sew the seam, because I had to keep stopping to guide my seam allowances and keep them from flipping over.
To make the process go smoother, I chose to lay out several blocks at a time. Then I would go through and pin my markers and 1+2 and 4+5 units. (I could do all of this while watching tv, too!) By the time I had the piecing process worked out, I was able to lay out, pin and sew several blocks at a time. I also waited until the entire block was assembled before pressing my seams, but that is a bit harder to work with than pressing as you go along.
If you want to try chain piecing, you may find it easier to use 1 pin at the top of column 2 and 2 pins at the top of column 5 to keep your pieces in order.
And now I've shared a little more about my crazy, type A habits. I hope that I've helped you rather than scared you away. ;)


1 comment:
It is great to get a system going and keep it going. When locking seams together it works best if you put the seam that will go under the foot first, on the top, so the feed dogs pull the bottom seam to lock them in place. Does that make sense???
Post a Comment